m (→Level: added links for completion, courtesy Niels Mayer) |
m (added out-of-date admonition) |
||
| (8 intermediate revisions by the same user not shown) | |||
| Line 1: | Line 1: | ||
{{ | {{admon/note|This Is out of Date|The most recent revisions of the Musicians' Guide are now available from the [https://fedorahosted.org/musicians-guide/browser/en-US git repository].}} | ||
<!-- | |||
Address: User:Crantila/FSC/Recording/DAW_Common_Elements | Address: User:Crantila/FSC/Recording/DAW_Common_Elements | ||
DocBook: "Digital_Audio_Workstations.xml" | |||
--> | |||
The term '''Digital Audio Workstation''' (henceforth '''DAW''') refers to the entire hardware and software setup used for professional (or professional-quality) audio recording, manipulation, synthesis, and production. It originally referred to devices purpose-built for the task, but as personal computers have become more powerful and wide-spread, certain specially-designed personal computers can also be thought of as DAWs. The software running on these computers, especially software capable of multi-track recording, playback, and synthesis, is simply called "DAW software," which is often shortened to "DAW." So, the term "DAW" and its usage are moderately ambiguous, but generally refere to one of the things mentioned. | |||
== Knowing Which DAW to Use == | |||
The Musicians' Guide covers three widely-used DAWs: Ardour, Qtractor, and Rosegarden. All three use JACK extensively, are highly configurable, share a similar user interface, and allow users to work with both audio and MIDI signals. Many other DAWs exist, including a wide selection of commercially-available solutions. Here is a brief description of the programs documented in this Guide: | |||
The Musicians' Guide covers three widely-used DAWs: Ardour, Qtractor, and Rosegarden. All three use JACK extensively, are highly configurable, share a similar user interface, and allow users to work with both audio and MIDI signals. Many other DAWs exist, | * Ardour: the open-source standard for audio manipulation. Flexible and extensible. | ||
* Ardour: the open-source standard for audio manipulation. | |||
* Qtractor: a relative new-comer, but easy to use; a "lean and mean," MIDI-focussed DAW. Available from Planet CCRMA at Home or RPM Fusion. | * Qtractor: a relative new-comer, but easy to use; a "lean and mean," MIDI-focussed DAW. Available from Planet CCRMA at Home or RPM Fusion. | ||
* Rosegarden: a well-tested, feature-packed workhorse of Linux audio, especially MIDI. Includes a visual score editor for creating MIDI tracks. | * Rosegarden: a well-tested, feature-packed workhorse of Linux audio, especially MIDI. Includes a visual score editor for creating MIDI tracks. | ||
If you are | If you are unsure of where to start, then you may not need a DAW at all: | ||
* If you are looking for a | * If you are looking for a high-quality recording application, or a tool for manipulating one audio file at a time, then you would probably be better off with Audacity. This will be the choice of most computer users, especially those new to computer audio, or looking for a quick solution requiring little specialized knowledge. Audacity is also a good way to get your first computer audio experiences, specifically because it is easier to use than most other audio software. | ||
* To take full advantage of the features offered by Ardour, Qtractor, and Rosegarden, your computer should be equipped with professional-quality audio equipment, including an after-market audio interface and input devices like microphones. If you do not have access to such equipment, then Audacity may be a better choice for you. | |||
* If you are simply hoping to create a "MIDI recording" of some sheet music, you are probably better off using LilyPond. This program is designed primarily to create printable sheet music, but it will produce a MIDI-format version of a score if you include the following command in the "score" section of your LilyPond source file: <code>\midi { }</code>. There are a selection of options that can be put in the "midi" section; refer to the LilyPond help files for a listing. | |||
== | == Stages of Recording == | ||
There are | There are three main stages involved in the the process of recording something and preparing it for listeners: recording, mixing, and mastering. Each step of the process has distinct characteristics, yet they can sometimes be mixed together. | ||
=== Recording === | |||
Recording is the process of capturing audio regions (also called "clips" or "segments") into the DAW software, for later processing. Recording is a complex process, involving a microphone that captures sound energy, translates it into electrical energy, and transmits it to an audio interface. The audio interface converts the electrical energy into digital singals, and sends it through the operating system to the DAW software. The DAW stores regions in memory and on the hard drive as required. Every time the musicians perform some (or all) of the performance to be recorded, while the DAW is recording, it is considered to be a '''take'''. A successful recording usually requires several takes, due to the inconsistencies of musical performance and of the related technological aspects. | |||
=== | === Mixing === | ||
Mixing is the process through which recorded audio regions (also called "clips") are coordinated to produce an aesthetically-appealing musical output. This usually takes place after recording, but sometimes additional takes will be needed. Mixing often involves reducing audio from multiple tracks into two channels, for stereo audio - a process known as "down-mixing," because it decreases the amount of audio data. | |||
Mixing includes the following procedures, among others: | |||
* automating effects, | |||
* adjusting levels, | |||
* time-shifting, | |||
* filtering, | |||
* panning, | |||
* adding special effects. | |||
When the person performing the mixing decides that they have finished, their finalized production is called the '''final mix'''. | |||
When the person performing mixing decides that they have finished, their finalized production is called the | |||
=== Mastering === | === Mastering === | ||
Mastering is the process through which a final | Mastering is the process through which a version of the final mix is prepared for distribution and listening. Mastering can be performed for many target formats, including CD, tape, SuperAudio CD, or hard drive. Mastering often involves a reduction in the information available in an audio file: audio CDs are commonly recorded with 20- or 24-bit samples, for example, and reduced to 16-bit samples during mastering. While most physical formats (like CDs) also specify the audio signal's format, audio recordings mastered to hard drive can take on many formats, including OGG, FLAC, AIFF, MP3, and many others. This allows the person doing the mastering some flexibility in choosing the quality and file size of the resulting audio. | ||
Even though they are both distinct activities, mixing and mastering sometimes use the same techniques. For example, a mastering technician might apply a specific equalization filter to optimize the audio for a particular physical medium. | Even though they are both distinct activities, mixing and mastering sometimes use the same techniques. For example, a mastering technician might apply a specific equalization filter to optimize the audio for a particular physical medium. | ||
=== | === More Information === | ||
It takes experience and practice to gain the skills involved in successful recording, mixing, and mastering. Further information about these procedures is available from many places, including these web pages: | |||
* [http://www.64studio.com/howto-mastering "Mastering your final mix"] | |||
* [http://en.wikipedia.org/wiki/Audio_mixing_%28recorded_music%29 "Audio mixing (recorded music)"] | |||
* [http://en.wikipedia.org/wiki/Multitrack_recording "Multitrack recording"] | |||
== Audio Vocabulary == | |||
{{:User:Crantila/FSC/Audio_Vocabulary}} | |||
== Interface Vocabulary == | |||
Understanding these concepts is essential to understanding how to use the DAW software's interface. | |||
=== Session === | |||
A '''session''' is all of the tracks, regions, automation settings, and everything else that goes along with one "file" saved by the DAW software. Some software DAWs manage to hide the entire session within one file, but others instead create a new directory to hold the regions and other data. | |||
Typically, one session is used to hold an entire recording session; it is broken up into individual songs or movements after recording. Sometimes, as in the tutorial examples with the Musicians' Guide, one session holds only one song or movement. There is no strict rule as to how much music should be held within one session, so your personal preference can determine what you do here. | |||
=== | === Track and Multi-track === | ||
A '''track''' represents one channel, or a pre-determined collection of simulatneous, inseparable channels (as is often the case with stereo audio). In the DAW's main window, tracks are usually represnted as rows, whereas time is represented by columns. A track may hold multiple regions, but usually only one of those regions can be heard at a time. The '''multi-track''' capability of modern software-based DAWs is one of the reasons for their success. Although each individual track can play only one region at a time, the use of multiple tracks allows the DAW's outputted audio to contain a virtually unlimited number of simultaneous regions. The most powerful aspect of this is that audio does not have to be recorded simultaneously in order to be played back simultaneously; you could sing a duet with yourself, for example. | |||
=== Region, Clip, or Segment === | |||
Region, clip, and segment are synonyms: different software uses a different word to refer to the same thing. A '''region''' (or '''clip''' or '''segment''') is the portion of audio recorded into one track during one take. Regions are represented in the main DAW interface window as a rectangle, usually coloured, and always contained in only one track. Regions containing audio signal data usually display a spectrographic representation of that data. Regions containing MIDI signal data usually displayed as matrix-based representation of that data. | |||
For the three DAW applications in the Musicians' Guide: | |||
* Ardour calls them "regions," | |||
* Qtractor calls them "clips," and, | |||
* Rosegarden calls them "segments." | |||
=== Relationship of Session, Track, and Region === | |||
Source image hidden here.<!-- [[File:Ardour-session_track_region.xcf]] --> | |||
[[File:Ardour-session_track_region.png|200px|left|Session, Track, and Region in Ardour.]] | |||
=== Transport and Playhead === | |||
The '''transport''' is responsible for managing the current time in a session, and with it the playhead. The '''playhead''' marks the point on the timeline from where audio audio would be played, or to where audio would be recorded. The transport controls the playhead, and whether it is set for recording or only playback. The transport can move the playhead forward or backward, in slow motion, fast motion, or real time. In most computer-based DAWs, the playhead can also be moved with the cursor. The playhead is represented on the DAW interface as a vertical line through all tracks. The transport's buttons and displays are usually located in a toolbar at the top of the DAW window, but some people prefer to have the transport controls detached from the main interface, and this is how they appear by default in Rosegarden. | |||
=== Automation === | === Automation === | ||
Automation of the DAW sounds like it might be an advanced topic, or something used to replace decisions made by a human. This is absolutely not the case - '''automation''' | Automation of the DAW sounds like it might be an advanced topic, or something used to replace decisions made by a human. This is absolutely not the case - '''automation''' allows the user to automatically make the same adjustments every time a session is played. This is superior to manual-only control because it allows very precise, gradual, and consistent adjustments, because it relieves you of having to remember the adjustments, and because it allows many more adjustments to be made simultaneously than you could make manually. The reality is that automation allows super-human control of a session. Most settings can be adjusted by means of automation; the most common are the fader and the panner. | ||
The most common method of automating a setting is with a graph called an '''envelope''', which is drawn on top of | The most common method of automating a setting is with a two-dimensional graph called an '''envelope''', which is drawn on top of an audio track, or underneath it in an '''automation track'''. The user adds adjustment points by adding and moving points on the graph. This method allows for complex, gradual changes of the seting, as well as simple, one-time changes. Automation is often controlled by means of MIDI signals, for both audio and MIDI tracks. This allows for external devices to adjust settings in the DAW, and vice-versa - you can actually automate your own hardware from within a software-based DAW! Of course, not all hardware supports this, so refer to your device's user manual. | ||
== | == User Interface == | ||
!! Hidden bonus info: links to all the images, including *.XCF source image !! | |||
<!-- | |||
File:Qtractor-interface.xcf | |||
File:Qtractor-interface-clocks.png | |||
File:Qtractor-interface-messages.png | |||
File:Qtractor-interface-track.png | |||
File:Qtractor-interface-track_info.png | |||
File:Qtractor-interface-transport.png | |||
--> | |||
This section describes various components of software-based DAW interfaces. Although th "Qtractor" application is visible in the images, both Ardour and Rosegarden (along with most other DAW software) have an interface that differs only in details, such as which buttons are located where. | |||
=== "Messages" Pane === | |||
[[File:Qtractor-interface-messages.png|300px|"Messages" Pane]] | |||
The "messages" pane, shown in the above diagram, contains messages produced by the DAW, and sometimes messages produced by software used by the DAW, such as JACK. If an error occurs, or if the DAW does not perform as expected, you should check the "messages" pane for information that may help you to get the desired results. The "messages" pane can also be used to determine whether JACK and the DAW were started successfully, with the options you prefer. | |||
=== Clock === | |||
[[File:Qtractor-interface-clocks.png|300px|Clock]] | |||
The clock shows the current place in the file, as indicated by the transport. In the image, you can see that the transport is at the beginning of the session, so the clock indicates "0". This clock is configured to show time in minutes and seconds, so it is a "time clock." Other possible settings for clocks are to show BBT (bars, beats, and ticks - a "MIDI clock"), samples (a "sample clock"), or an SMPTE timecode (used for high-precision synchronization, usually with video - a "timecode clock"). Some DAWs allow the use of multiple clocks simultaneously. | |||
Note that this particular time clock in "Qtractor" also offers information about the MIDI tempo and metre (120.0 beats per minute, and 4/4 metre), along with a quantization setting for MIDI recording. | |||
=== | === "Track Info" Pane === | ||
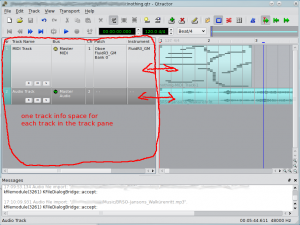
[[File:Qtractor-interface-track_info.png|300px|"Track Info" Pane]] | |||
The "track info" pane contains information and settings for each track and bus in the session. Here, you can usually adjust settings like the routing of a track's or bus' input and output routing, the instrument, bank, program, and channel of MIDI tracks, and the three buttons shown on this image: "R" for "arm to record," "M" for "mute/silence track's output," and "S" for "solo mode," where only the selected tracks and busses are heard. | |||
The information provided, and the layout of buttons, can change dramatically between DAWs, but they all offer the same basic functionality. Often, right-clicking on a track info box will give access to extended configuration options. Left-clicking on a portion of the track info box that is not a button allows you to select a track without selecting a particular moment in "track" pane. | |||
The "track info" pane does not scroll out of view as the "track" pane is adjusted, but is independent. | |||
=== "Track" Pane === | |||
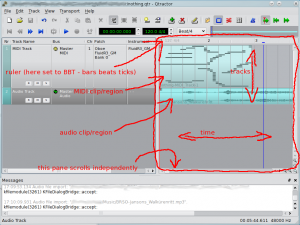
[[File:Qtractor-interface-track.png|300px|"Track" Pane]] | |||
The "track" pane is the main workspace in a DAW. It shows regions (also called "clips") with a rough overview of the audio wave-form or MIDI notes, allows you to adjust the starting-time and length of regions, and also allows you to assign or re-assign a region to a track. The "track" pane shows the transport as a vertical line; in this image it is the left-most red line in the "track" pane. | |||
Scrolling the "track" pane horizontally allows you to view the regions throughout the session. The left-most point is the start of the session; the right-most point is after the end of the session. Most DAWs allow you to scroll well beyond the end of the session. Scrolling vertically in the "track" pane allows you to view the regions and tracks in a particular time range. | |||
=== | === Transport Controls === | ||
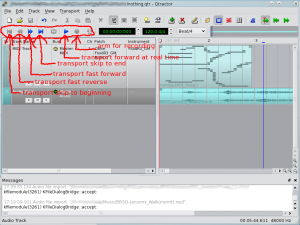
[[File:Qtractor-interface-transport.png|300px|Transport Controls]] | |||
The transport controls allow you to manipulate the transport in various ways. The shape of the buttons is somewhat standardized; a similar-looking button will usually perform the same function in all DAWs, as well as in consumer electronic devices like CD players and DVD players. | |||
The | |||
The single, left-pointing arrow with a vertical line will move the transport to the start of the session, without playing or recording any material. In "Qtractor," if there is a blue place-marker between the transport and the start of the session, the transport will skip to the blue place-marker. You can press the button again if you wish to skip to the next blue place-marker or the beginning of the session. | |||
The | The double left-pointing arrows move the transport in fast motion, towards the start of the session. The double right-pointing arrows move the transport in fast motion, towards the end of the session. | ||
The single, right-pointing arrow with a vertical line will move the transport to the end of the last region currently in a session. In "Qtractor," if there is a blue place-marker between the transport and the end of the last region in the session, the transport will skip to the blue place-marker. You can press the button again if you wish to skip to the next blue place-marker or the end of the last region in the session. | |||
The single, right-pointing arrow is commonly called "play," but it actually moves the transport forward in real-time. When it does this, if the transport is armed for recording, any armed tracks will record. Whether or not the transport is armed, pressing the "play" button causes all un-armed tracks to play all existing regions. | |||
The circular button arms the transport for recording. It is conventionally red in colour. In "Qtractor," the transport can only be armed ''after'' at least one track has been armed; to show this, the transport's "arm" button only turns red if a track is armed. | |||
Latest revision as of 06:35, 2 August 2010
The term Digital Audio Workstation (henceforth DAW) refers to the entire hardware and software setup used for professional (or professional-quality) audio recording, manipulation, synthesis, and production. It originally referred to devices purpose-built for the task, but as personal computers have become more powerful and wide-spread, certain specially-designed personal computers can also be thought of as DAWs. The software running on these computers, especially software capable of multi-track recording, playback, and synthesis, is simply called "DAW software," which is often shortened to "DAW." So, the term "DAW" and its usage are moderately ambiguous, but generally refere to one of the things mentioned.
Knowing Which DAW to Use
The Musicians' Guide covers three widely-used DAWs: Ardour, Qtractor, and Rosegarden. All three use JACK extensively, are highly configurable, share a similar user interface, and allow users to work with both audio and MIDI signals. Many other DAWs exist, including a wide selection of commercially-available solutions. Here is a brief description of the programs documented in this Guide:
- Ardour: the open-source standard for audio manipulation. Flexible and extensible.
- Qtractor: a relative new-comer, but easy to use; a "lean and mean," MIDI-focussed DAW. Available from Planet CCRMA at Home or RPM Fusion.
- Rosegarden: a well-tested, feature-packed workhorse of Linux audio, especially MIDI. Includes a visual score editor for creating MIDI tracks.
If you are unsure of where to start, then you may not need a DAW at all:
- If you are looking for a high-quality recording application, or a tool for manipulating one audio file at a time, then you would probably be better off with Audacity. This will be the choice of most computer users, especially those new to computer audio, or looking for a quick solution requiring little specialized knowledge. Audacity is also a good way to get your first computer audio experiences, specifically because it is easier to use than most other audio software.
- To take full advantage of the features offered by Ardour, Qtractor, and Rosegarden, your computer should be equipped with professional-quality audio equipment, including an after-market audio interface and input devices like microphones. If you do not have access to such equipment, then Audacity may be a better choice for you.
- If you are simply hoping to create a "MIDI recording" of some sheet music, you are probably better off using LilyPond. This program is designed primarily to create printable sheet music, but it will produce a MIDI-format version of a score if you include the following command in the "score" section of your LilyPond source file:
\midi { }. There are a selection of options that can be put in the "midi" section; refer to the LilyPond help files for a listing.
Stages of Recording
There are three main stages involved in the the process of recording something and preparing it for listeners: recording, mixing, and mastering. Each step of the process has distinct characteristics, yet they can sometimes be mixed together.
Recording
Recording is the process of capturing audio regions (also called "clips" or "segments") into the DAW software, for later processing. Recording is a complex process, involving a microphone that captures sound energy, translates it into electrical energy, and transmits it to an audio interface. The audio interface converts the electrical energy into digital singals, and sends it through the operating system to the DAW software. The DAW stores regions in memory and on the hard drive as required. Every time the musicians perform some (or all) of the performance to be recorded, while the DAW is recording, it is considered to be a take. A successful recording usually requires several takes, due to the inconsistencies of musical performance and of the related technological aspects.
Mixing
Mixing is the process through which recorded audio regions (also called "clips") are coordinated to produce an aesthetically-appealing musical output. This usually takes place after recording, but sometimes additional takes will be needed. Mixing often involves reducing audio from multiple tracks into two channels, for stereo audio - a process known as "down-mixing," because it decreases the amount of audio data.
Mixing includes the following procedures, among others:
- automating effects,
- adjusting levels,
- time-shifting,
- filtering,
- panning,
- adding special effects.
When the person performing the mixing decides that they have finished, their finalized production is called the final mix.
Mastering
Mastering is the process through which a version of the final mix is prepared for distribution and listening. Mastering can be performed for many target formats, including CD, tape, SuperAudio CD, or hard drive. Mastering often involves a reduction in the information available in an audio file: audio CDs are commonly recorded with 20- or 24-bit samples, for example, and reduced to 16-bit samples during mastering. While most physical formats (like CDs) also specify the audio signal's format, audio recordings mastered to hard drive can take on many formats, including OGG, FLAC, AIFF, MP3, and many others. This allows the person doing the mastering some flexibility in choosing the quality and file size of the resulting audio.
Even though they are both distinct activities, mixing and mastering sometimes use the same techniques. For example, a mastering technician might apply a specific equalization filter to optimize the audio for a particular physical medium.
More Information
It takes experience and practice to gain the skills involved in successful recording, mixing, and mastering. Further information about these procedures is available from many places, including these web pages:
Audio Vocabulary
These terms are used in many different audio contexts. Understanding them is important to knowing how to operate audio equipment in general, whether computer-based or not.
MIDI Sequencer
A sequencer is a device or software program that produces signals that a synthesizer turns into sound. You can also use a sequencer to arrange MIDI signals into music. The Musicians' Guide covers two digital audio workstations (DAWs) that are primarily MIDI sequencers, Qtractor and Rosegarden. All three DAWs in this guide use MIDI signals to control other devices or effects.
Busses, Master Bus, and Sub-master Bus
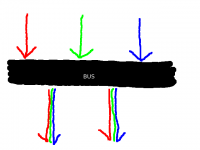
An audio bus sends audio signals from one place to another. Many different signals can be inputted to a bus simultaneously, and many different devices or applications can read from a bus simultaneously. Signals inputted to a bus are mixed together, and cannot be separated after entering a bus. All devices or applications reading from a bus receive the same signal.
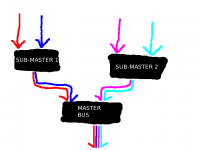
All audio routed out of a program passes through the master bus. The master bus combines all audio tracks, allowing for final level adjustments and simpler mastering. The primary purpose of the master bus is to mix all of the tracks into two channels.
A sub-master bus combines audio signals before they reach the master bus. Using a sub-master bus is optional. They allow you to adjust more than one track in the same way, without affecting all the tracks.
Audio busses are also used to send audio into effects processors.
Level (Volume/Loudness)
The perceived volume or loudness of sound is a complex phenomenon, not entirely understood by experts. One widely-agreed method of assessing loudness is by measuring the sound pressure level (SPL), which is measured in decibels (dB) or bels (B, equal to ten decibels). In audio production communities, this is called "level." The level of an audio signal is one way of measuring the signal's perceived loudness. The level is part of the information stored in an audio file.
There are many different ways to monitor and adjust the level of an audio signal, and there is no widely-agreed practice. One reason for this situation is the technical limitations of recorded audio. Most level meters are designed so that the average level is -6 dB on the meter, and the maximum level is 0 dB. This practice was developed for analog audio. We recommend using an external meter and the "K-system," described in a link below. The K-system for level metering was developed for digital audio.
In the Musicians' Guide, this term is called "volume level," to avoid confusion with other levels, or with perceived volume or loudness.
For more information, refer to these web pages:
- "Level Practices" (the type of meter described here is available in the "jkmeter" package from Planet CCRMA at Home).
- "K-system"
- "Headroom"
- "Equal-loudness contour"
- "Sound level meter"
- "Listener fatigue"
- "Dynamic range compression"
- "Alignment level"
Panning and Balance
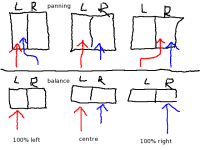
Panning adjusts the portion of a channel's signal that is sent to each output channel. In a stereophonic (two-channel) setup, the two channels represent the "left" and the "right" speakers. Two channels of recorded audio are available in the DAW, and the default setup sends all of the "left" recorded channel to the "left" output channel, and all of the "right" recorded channel to the "right" output channel. Panning sends some of the left recorded channel's level to the right output channel, or some of the right recorded channel's level to the left output channel. Each recorded channel has a constant total output level, which is divided between the two output channels.
The default setup for a left recorded channel is for "full left" panning, meaning that 100% of the output level is output to the left output channel. An audio engineer might adjust this so that 80% of the recorded channel's level is output to the left output channel, and 20% of the level is output to the right output channel. An audio engineer might make the left recorded channel sound like it is in front of the listener by setting the panner to "center," meaning that 50% of the output level is output to both the left and right output channels.
Balance is sometimes confused with panning, even on commercially-available audio equipment. Adjusting the balance changes the volume level of the output channels, without redirecting the recorded signal. The default setting for balance is "center," meaning 0% change to the volume level. As you adjust the dial from "center" toward the "full left" setting, the volume level of the right output channel is decreased, and the volume level of the left output channel remains constant. As you adjust the dial from "center" toward the "full right" setting, the volume level of the left output channel is decreased, and the volume level of the right output channel remains constant. If you set the dial to "20% left," the audio equipment would reduce the volume level of the right output channel by 20%, increasing the perceived loudness of the left output channel by approximately 20%.
You should adjust the balance so that you perceive both speakers as equally loud. Balance compensates for poorly set up listening environments, where the speakers are not equal distances from the listener. If the left speaker is closer to you than the right speaker, you can adjust the balance to the right, which decreases the volume level of the left speaker. This is not an ideal solution, but sometimes it is impossible or impractical to set up your speakers correctly. You should adjust the balance only at final playback.
Time, Timeline and Time-Shifting
There are many ways to measure musical time. The four most popular time scales for digital audio are:
- Bars and Beats: Usually used for MIDI work, and called "BBT," meaning "Bars, Beats, and Ticks." A tick is a partial beat.
- Minutes and Seconds: Usually used for audio work.
- SMPTE Timecode: Invented for high-precision coordination of audio and video, but can be used with audio alone.
- Samples: Relating directly to the format of the underlying audio file, a sample is the shortest possible length of time in an audio file. See this section for more information on samples.
Most audio software, particularly digital audio workstations (DAWs), allow the user to choose which scale they prefer. DAWs use a timeline to display the progression of time in a session, allowing you to do time-shifting; that is, adjust the time in the timeline when a region starts to be played.
Time is represented horizontally, where the leftmost point is the beginning of the session (zero, regardless of the unit of measurement), and the rightmost point is some distance after the end of the session.
Synchronization
Synchronization is synchronizing the operation of multiple tools, frequently the movement of the transport. Synchronization also controls automation across applications and devices. MIDI signals are usually used for synchronization.
Routing and Multiplexing
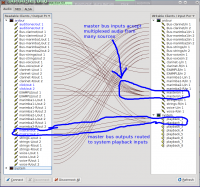
Routing audio transmits a signal from one place to another - between applications, between parts of applications, or between devices. On Linux systems, the JACK Audio Connection Kit is used for audio routing. JACK-aware applications (and PulseAudio ones, if so configured) provide inputs and outputs to the JACK server, depending on their configuration. The QjackCtl application can adjust the default connections. You can easily reroute the output of a program like FluidSynth so that it can be recorded by Ardour, for example, by using QjackCtl.
Multiplexing allows you to connect multiple devices and applications to a single input or output. QjackCtl allows you to easily perform multiplexing. This may not seem important, but remember that only one connection is possible with a physical device like an audio interface. Before computers were used for music production, multiplexing required physical devices to split or combine the signals.
Multichannel Audio
An audio channel is a single path of audio data. Multichannel audio is any audio which uses more than one channel simultaneously, allowing the transmission of more audio data than single-channel audio.
Audio was originally recorded with only one channel, producing "monophonic," or "mono" recordings. Beginning in the 1950s, stereophonic recordings, with two independent channels, began replacing monophonic recordings. Since humans have two independent ears, it makes sense to record and reproduce audio with two independent channels, involving two speakers. Most sound recordings available today are stereophonic, and people have found this mostly satisfying.
There is a growing trend toward five- and seven-channel audio, driven primarily by "surround-sound" movies, and not widely available for music. Two "surround-sound" formats exist for music: DVD Audio (DVD-A) and Super Audio CD (SACD). The development of these formats, and the devices to use them, is held back by the proliferation of headphones with personal MP3 players, a general lack of desire for improvement in audio quality amongst consumers, and the copy-protection measures put in place by record labels. The result is that, while some consumers are willing to pay higher prices for DVD-A or SACD recordings, only a small number of recordings are available. Even if you buy a DVD-A or SACD-capable player, you would need to replace all of your audio equipment with models that support proprietary copy-protection software. Without this equipment, the player is often forbidden from outputting audio with a higher sample rate or sample format than a conventional audio CD. None of these factors, unfortunately, seem like they will change in the near future.
Interface Vocabulary
Understanding these concepts is essential to understanding how to use the DAW software's interface.
Session
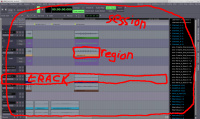
A session is all of the tracks, regions, automation settings, and everything else that goes along with one "file" saved by the DAW software. Some software DAWs manage to hide the entire session within one file, but others instead create a new directory to hold the regions and other data.
Typically, one session is used to hold an entire recording session; it is broken up into individual songs or movements after recording. Sometimes, as in the tutorial examples with the Musicians' Guide, one session holds only one song or movement. There is no strict rule as to how much music should be held within one session, so your personal preference can determine what you do here.
Track and Multi-track
A track represents one channel, or a pre-determined collection of simulatneous, inseparable channels (as is often the case with stereo audio). In the DAW's main window, tracks are usually represnted as rows, whereas time is represented by columns. A track may hold multiple regions, but usually only one of those regions can be heard at a time. The multi-track capability of modern software-based DAWs is one of the reasons for their success. Although each individual track can play only one region at a time, the use of multiple tracks allows the DAW's outputted audio to contain a virtually unlimited number of simultaneous regions. The most powerful aspect of this is that audio does not have to be recorded simultaneously in order to be played back simultaneously; you could sing a duet with yourself, for example.
Region, Clip, or Segment
Region, clip, and segment are synonyms: different software uses a different word to refer to the same thing. A region (or clip or segment) is the portion of audio recorded into one track during one take. Regions are represented in the main DAW interface window as a rectangle, usually coloured, and always contained in only one track. Regions containing audio signal data usually display a spectrographic representation of that data. Regions containing MIDI signal data usually displayed as matrix-based representation of that data.
For the three DAW applications in the Musicians' Guide:
- Ardour calls them "regions,"
- Qtractor calls them "clips," and,
- Rosegarden calls them "segments."
Relationship of Session, Track, and Region
Source image hidden here.
Transport and Playhead
The transport is responsible for managing the current time in a session, and with it the playhead. The playhead marks the point on the timeline from where audio audio would be played, or to where audio would be recorded. The transport controls the playhead, and whether it is set for recording or only playback. The transport can move the playhead forward or backward, in slow motion, fast motion, or real time. In most computer-based DAWs, the playhead can also be moved with the cursor. The playhead is represented on the DAW interface as a vertical line through all tracks. The transport's buttons and displays are usually located in a toolbar at the top of the DAW window, but some people prefer to have the transport controls detached from the main interface, and this is how they appear by default in Rosegarden.
Automation
Automation of the DAW sounds like it might be an advanced topic, or something used to replace decisions made by a human. This is absolutely not the case - automation allows the user to automatically make the same adjustments every time a session is played. This is superior to manual-only control because it allows very precise, gradual, and consistent adjustments, because it relieves you of having to remember the adjustments, and because it allows many more adjustments to be made simultaneously than you could make manually. The reality is that automation allows super-human control of a session. Most settings can be adjusted by means of automation; the most common are the fader and the panner.
The most common method of automating a setting is with a two-dimensional graph called an envelope, which is drawn on top of an audio track, or underneath it in an automation track. The user adds adjustment points by adding and moving points on the graph. This method allows for complex, gradual changes of the seting, as well as simple, one-time changes. Automation is often controlled by means of MIDI signals, for both audio and MIDI tracks. This allows for external devices to adjust settings in the DAW, and vice-versa - you can actually automate your own hardware from within a software-based DAW! Of course, not all hardware supports this, so refer to your device's user manual.
User Interface
!! Hidden bonus info: links to all the images, including *.XCF source image !! This section describes various components of software-based DAW interfaces. Although th "Qtractor" application is visible in the images, both Ardour and Rosegarden (along with most other DAW software) have an interface that differs only in details, such as which buttons are located where.
"Messages" Pane
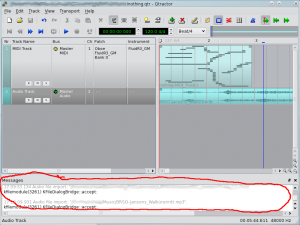
The "messages" pane, shown in the above diagram, contains messages produced by the DAW, and sometimes messages produced by software used by the DAW, such as JACK. If an error occurs, or if the DAW does not perform as expected, you should check the "messages" pane for information that may help you to get the desired results. The "messages" pane can also be used to determine whether JACK and the DAW were started successfully, with the options you prefer.
Clock
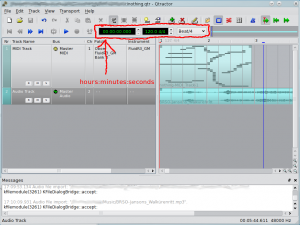
The clock shows the current place in the file, as indicated by the transport. In the image, you can see that the transport is at the beginning of the session, so the clock indicates "0". This clock is configured to show time in minutes and seconds, so it is a "time clock." Other possible settings for clocks are to show BBT (bars, beats, and ticks - a "MIDI clock"), samples (a "sample clock"), or an SMPTE timecode (used for high-precision synchronization, usually with video - a "timecode clock"). Some DAWs allow the use of multiple clocks simultaneously.
Note that this particular time clock in "Qtractor" also offers information about the MIDI tempo and metre (120.0 beats per minute, and 4/4 metre), along with a quantization setting for MIDI recording.
"Track Info" Pane
The "track info" pane contains information and settings for each track and bus in the session. Here, you can usually adjust settings like the routing of a track's or bus' input and output routing, the instrument, bank, program, and channel of MIDI tracks, and the three buttons shown on this image: "R" for "arm to record," "M" for "mute/silence track's output," and "S" for "solo mode," where only the selected tracks and busses are heard.
The information provided, and the layout of buttons, can change dramatically between DAWs, but they all offer the same basic functionality. Often, right-clicking on a track info box will give access to extended configuration options. Left-clicking on a portion of the track info box that is not a button allows you to select a track without selecting a particular moment in "track" pane.
The "track info" pane does not scroll out of view as the "track" pane is adjusted, but is independent.
"Track" Pane
The "track" pane is the main workspace in a DAW. It shows regions (also called "clips") with a rough overview of the audio wave-form or MIDI notes, allows you to adjust the starting-time and length of regions, and also allows you to assign or re-assign a region to a track. The "track" pane shows the transport as a vertical line; in this image it is the left-most red line in the "track" pane.
Scrolling the "track" pane horizontally allows you to view the regions throughout the session. The left-most point is the start of the session; the right-most point is after the end of the session. Most DAWs allow you to scroll well beyond the end of the session. Scrolling vertically in the "track" pane allows you to view the regions and tracks in a particular time range.
Transport Controls
The transport controls allow you to manipulate the transport in various ways. The shape of the buttons is somewhat standardized; a similar-looking button will usually perform the same function in all DAWs, as well as in consumer electronic devices like CD players and DVD players.
The single, left-pointing arrow with a vertical line will move the transport to the start of the session, without playing or recording any material. In "Qtractor," if there is a blue place-marker between the transport and the start of the session, the transport will skip to the blue place-marker. You can press the button again if you wish to skip to the next blue place-marker or the beginning of the session.
The double left-pointing arrows move the transport in fast motion, towards the start of the session. The double right-pointing arrows move the transport in fast motion, towards the end of the session.
The single, right-pointing arrow with a vertical line will move the transport to the end of the last region currently in a session. In "Qtractor," if there is a blue place-marker between the transport and the end of the last region in the session, the transport will skip to the blue place-marker. You can press the button again if you wish to skip to the next blue place-marker or the end of the last region in the session.
The single, right-pointing arrow is commonly called "play," but it actually moves the transport forward in real-time. When it does this, if the transport is armed for recording, any armed tracks will record. Whether or not the transport is armed, pressing the "play" button causes all un-armed tracks to play all existing regions.
The circular button arms the transport for recording. It is conventionally red in colour. In "Qtractor," the transport can only be armed after at least one track has been armed; to show this, the transport's "arm" button only turns red if a track is armed.

