No edit summary |
No edit summary |
||
| (2 intermediate revisions by the same user not shown) | |||
| Line 30: | Line 30: | ||
## Finally let's make port 8080 available: {{command|sudo firewall-cmd --add-port 8080/tcp}} | ## Finally let's make port 8080 available: {{command|sudo firewall-cmd --add-port 8080/tcp}} | ||
|actions= | |actions= | ||
# | # It is recommended to turn file logging on in order to be able to debug if some thermostat command fails. See [[QA:Testcase_thermostat_logging| the logging test case]] for details. | ||
# Now on VM3 and VM2, we'll start agents, connecting to web storage on VM2: | |||
## VM3 -> {{command|thermostat agent -d http://192.168.122.168:8080/thermostat/storage &}} | |||
## VM2 -> {{command|thermostat agent -d http://192.168.122.168:8080/thermostat/storage &}} | |||
# Next, on VM3 start the swing client connecting to storage of VM2: {{command|thermostat gui}} | |||
|results= | |results= | ||
# | # At step 2.1 and 2.2 make sure that the connection succeeded and the agent collects data. | ||
# At setp 3, this should come up with something like the following. Click on "Configure" and use http://192.168.122.168:8080/thermostat/storage as the connection URL and "client-tester" and "tester" as username and password, respectively. Once that's done click "OK" and it should bring up the usual interface of the swing client: | |||
[[Image:ThermostatTestDayFailedToConnect.png]] | |||
# You should see both agents listed: "View" => "View all agents...". | |||
}} | }} | ||
Latest revision as of 13:04, 23 May 2013
Description
This test case tests whether Thermostat works correctly in a remote setup. This test will require at least 3 F19 virtual machines which can communicate with each other via a virtual network. One virtual machine acts as backing storage node. The second virtual machine will have the web service running connecting to the remote backing storage node. The third VM will be used to run thermostat agent and client components, connecting to the second node running the web service.
Setup
- For simplicity we identify the three VMs by their IP (netmask 255.255.255.0). VM1 = 192.168.122.153, VM2 = 192.168.122.168, VM3 = 192.168.122.39
- On all three VMs install thermostat
- On one of the VM, VM2, install thermostat-webapp
- Setting up storage on VM1:
- Get the storage IP binding setup script:
wget http://jerboaa.fedorapeople.org/thermostat/testday20130523/setup_remote_storage.sh - Since VM1 has IP 192.168.122.153 we execute the script as follows:
bash setup_remote_storage.sh 192.168.122.153 ~/.thermostat - This sets up a user in mongodb, namely "webservice1", with password "test". We'll use these credentials for the web service connection set up.
- Start storage:
thermostat storage --start - Make sure that port 27518 is accessible from outside of VM1 (check firewall config):
sudo firewall-cmd --add-port 27518/tcp
- Get the storage IP binding setup script:
- Setting up the web service on VM2:
- First, we need to tell the web app where our backing storage node is. In order to do so edit web.xml:
sudo vim /usr/share/tomcat/webapps/thermostat/WEB-INF/web.xml. It should contain the following sections (you can leave the rest as is):
- First, we need to tell the web app where our backing storage node is. In order to do so edit web.xml:
    <init-param>
      <param-name>storage.endpoint</param-name>
      <param-value>mongodb://192.168.122.153:27518</param-value>
    </init-param>
    <init-param>
      <param-name>storage.username</param-name>
      <param-value>webservice1</param-value>
    </init-param>
    <init-param>
      <param-name>storage.password</param-name>
      <param-value>test</param-value>
    </init-param>
- The rest of the config should be as described in the basic web testcase
- Finally let's make port 8080 available:
sudo firewall-cmd --add-port 8080/tcp
How to test
- It is recommended to turn file logging on in order to be able to debug if some thermostat command fails. See the logging test case for details.
- Now on VM3 and VM2, we'll start agents, connecting to web storage on VM2:
- VM3 ->
thermostat agent -d http://192.168.122.168:8080/thermostat/storage & - VM2 ->
thermostat agent -d http://192.168.122.168:8080/thermostat/storage &
- VM3 ->
- Next, on VM3 start the swing client connecting to storage of VM2:
thermostat gui
Expected Results
- At step 2.1 and 2.2 make sure that the connection succeeded and the agent collects data.
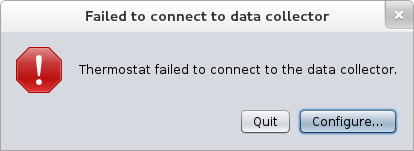
- At setp 3, this should come up with something like the following. Click on "Configure" and use http://192.168.122.168:8080/thermostat/storage as the connection URL and "client-tester" and "tester" as username and password, respectively. Once that's done click "OK" and it should bring up the usual interface of the swing client:
- You should see both agents listed: "View" => "View all agents...".


