From Fedora Project Wiki
| Line 37: | Line 37: | ||
: 5. A new task editor will appear. You can enter the following information: | : 5. A new task editor will appear. You can enter the following information: | ||
:: '''Required''' | |||
: '''Description''' - Enter a brief task description in the text box at the top (this box does not have a label). | ::: '''Description''' - Enter a brief task description in the text box at the top (this box does not have a label). | ||
: '''Component''' - Specify a "Component" to further categorize this task within the previously selected "Product". | ::: '''Component''' - Specify a "Component" to further categorize this task within the previously selected "Product". | ||
: '''Description''' - Describe the task in detail. | ::: '''Description''' - Describe the task in detail. | ||
:: '''Optional''' | |||
: You can specify additional information about your tasks in the "Attributes" section. | ::: You can specify additional information about your tasks in the "Attributes" section. | ||
: '''Personal Planning''' - You can enter information in this section that will be local to your workspace and '''not''' available on your team's task repository. See "Local Tasks" for more information about the personal planning fields. | ::: '''Personal Planning''' - You can enter information in this section that will be local to your workspace and '''not''' available on your team's task repository. See "Local Tasks" for more information about the personal planning fields. | ||
: '''Assigned to''' - Specify who should work on the task. Type the first several characters of the person's email address, and then press ctrl+space to select the address from a list. A task can be assigned to only one person at a time. | ::: '''Assigned to''' - Specify who should work on the task. Type the first several characters of the person's email address, and then press ctrl+space to select the address from a list. A task can be assigned to only one person at a time. | ||
: '''Add CC''' - Add the addresses of people who should be notified of changes to this task. You can add multiple addresses, separated by a comma, e.g. (mik.kersten@tasktop.com, steffen.pingel@tasktop.com). | ::: '''Add CC''' - Add the addresses of people who should be notified of changes to this task. You can add multiple addresses, separated by a comma, e.g. (mik.kersten@tasktop.com, steffen.pingel@tasktop.com). | ||
: 6.When finished, click '''Submit''' to add your new task to your team's shared task repository. | : 6.When finished, click '''Submit''' to add your new task to your team's shared task repository. | ||
More information on how to use Mylyn can be found on this [http://wiki.eclipse.org/index.php/Mylyn/User_Guide user guide] or offline by clicking on '''Help''' > '''Help Contents''' > '''Mylyn Documentation''' | * More information on how to use Mylyn can be found on this [http://wiki.eclipse.org/index.php/Mylyn/User_Guide user guide] or offline by clicking on '''Help''' > '''Help Contents''' > '''Mylyn Documentation''' | ||
Revision as of 03:58, 31 May 2011
Using Red Hat Bugzilla with Mylyn >= 3.5.0
The eclipse-mylyn-tasks-bugzilla package (available since Fedora 15) allows Mylyn users to interact with Bugzilla bug trackers from within Eclipse. As of version 3.5.0 of Mylyn it also supports Bugzilla instances, which use custom workflows (which Red Hat Bugzilla does).
Here are instructions as to how to set up a Red Hat Bugzilla task repository:
Installing eclipse-mylyn-tasks-bugzilla
eclipse-mylyn-tasks-bugzilla is available in Fedora 15 and later.
su -c "yum install eclipse-mylyn-tasks-bugzilla"
Setting up the Mylyn task repository with the provided custom transition file
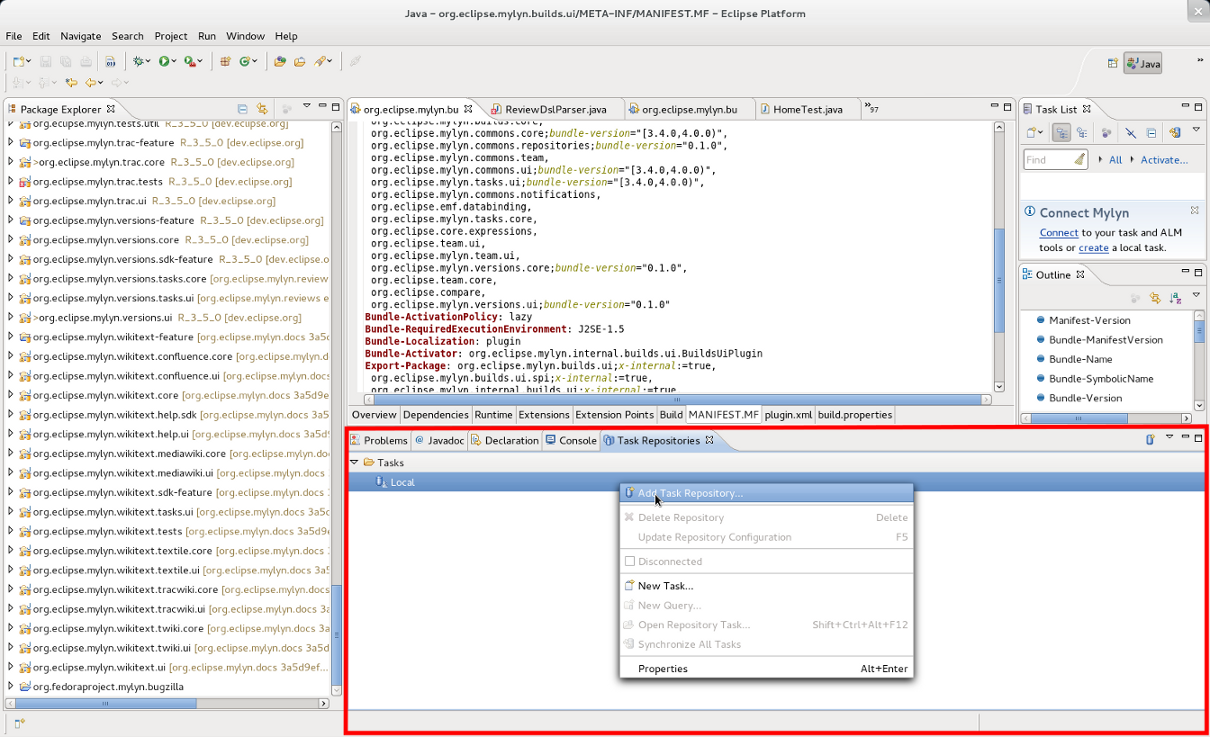
- 1. Fire up Eclipse and open the Task Repositories view provided by Mylyn: Window > Show View > Other... > Mylyn > Task Repositories.
- 2. Right-click and select Add New Task Repository...:
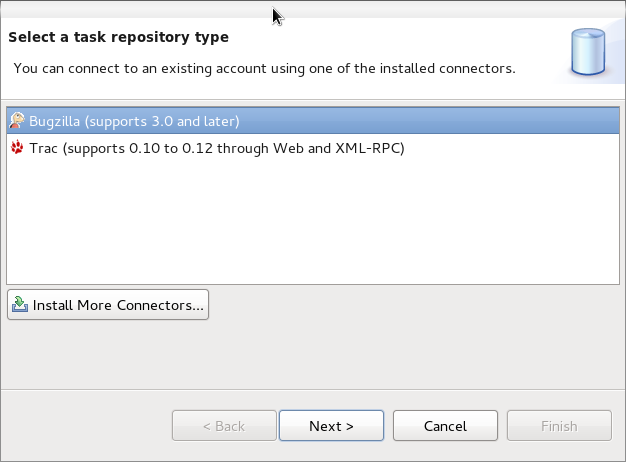
- 3. Once you've clicked on that, you'll have the choice to select task repository-types. Here you can select Bugzilla:
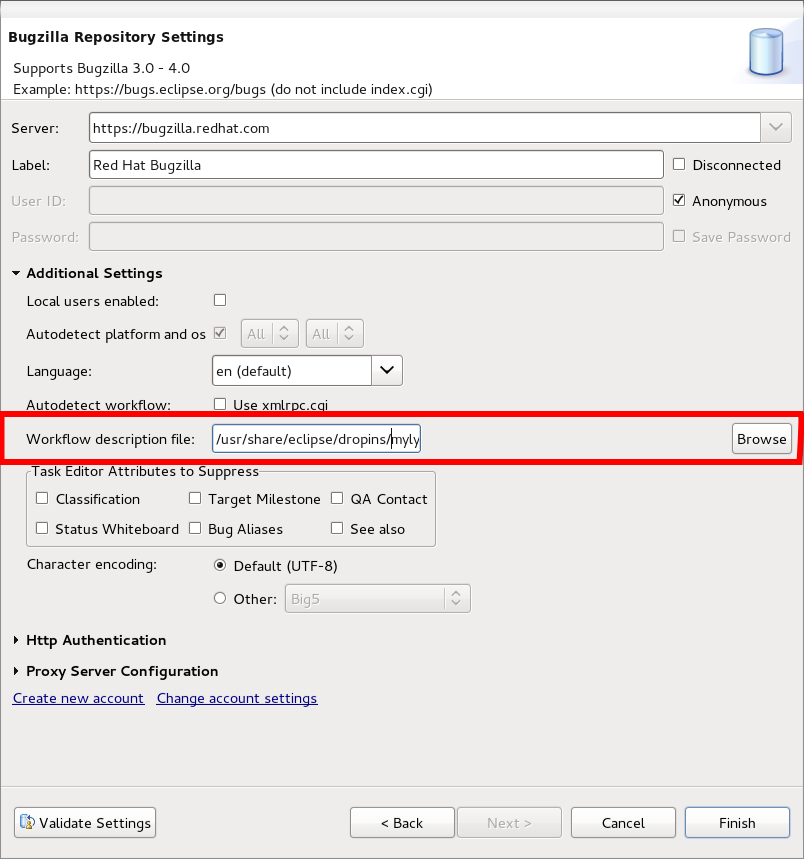
- 4. When you click Next you should see something like this screen-shot:
- 5. Now, select the custom transitions definitions file (either by entering the path directly, or by using the Browse button):
/usr/share/eclipse/dropins/mylyn-bugzilla/redhat-bugzilla-custom-transitions.txt. - 6. Once you are done, you can test your configuration by clicking Validate Settings.
- 7. If that shows no errors, click Finish and you should be good to go. .
Creating a New Task
- 1. click on the New Task button in the Task List's toolbar.
- 2. You can then select the repository where you would like to create a task. If you don't see your team's task repository, you will need to configure it in the task repositories view.
- 3. Once you have selected a repository, click Next.
- 4. If you are connecting to a bugzilla repository, select a Product as a top-level category for your task and click Finish.
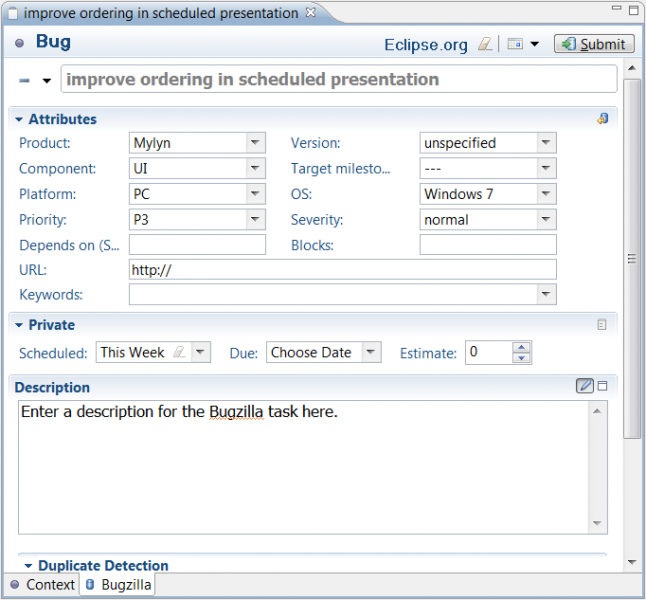
- 5. A new task editor will appear. You can enter the following information:
- Required
- Description - Enter a brief task description in the text box at the top (this box does not have a label).
- Component - Specify a "Component" to further categorize this task within the previously selected "Product".
- Description - Describe the task in detail.
- Required
- Optional
- You can specify additional information about your tasks in the "Attributes" section.
- Personal Planning - You can enter information in this section that will be local to your workspace and not available on your team's task repository. See "Local Tasks" for more information about the personal planning fields.
- Assigned to - Specify who should work on the task. Type the first several characters of the person's email address, and then press ctrl+space to select the address from a list. A task can be assigned to only one person at a time.
- Add CC - Add the addresses of people who should be notified of changes to this task. You can add multiple addresses, separated by a comma, e.g. (mik.kersten@tasktop.com, steffen.pingel@tasktop.com).
- Optional
- 6.When finished, click Submit to add your new task to your team's shared task repository.
- More information on how to use Mylyn can be found on this user guide or offline by clicking on Help > Help Contents > Mylyn Documentation


