(→U-boot) |
|||
| Line 108: | Line 108: | ||
==== U-boot ==== | ==== U-boot ==== | ||
本文主要使用 Smaeul 的补丁, 但是会 rebase 到最新的主线上游 U-boot, 并使能更多的特性并添加一些运行时的默认环境变量来自动载入 GRUB。 | |||
[https://github.com/tekkamanninja/u-boot Tekkaman | [https://github.com/tekkamanninja/u-boot Tekkaman 的 U-boot 仓库] | ||
===== | ===== 编译 ===== | ||
<pre> | <pre> | ||
git clone https://github.com/tekkamanninja/u-boot -b allwinner_d1 | git clone https://github.com/tekkamanninja/u-boot -b allwinner_d1 | ||
| Line 122: | Line 122: | ||
</pre> | </pre> | ||
最终生成的'''u-boot.bin''' 的 '''u-boot.dtb''' 将在下面被放入 '''u-boot.toc1''' 中. | |||
==== Build u-boot.toc1 ==== | ==== Build u-boot.toc1 ==== | ||
Revision as of 18:22, 6 September 2021

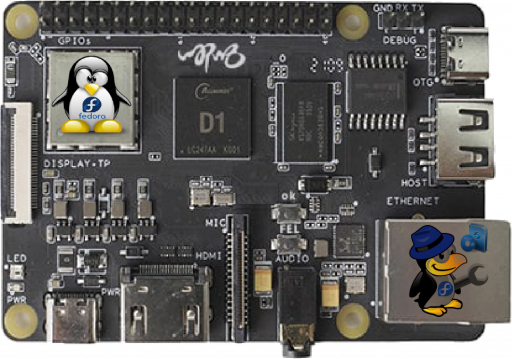
哪吒是一个基于全志 D1的单板计算机(SBC). 此页用于集中所有关于Fedora on Nezha的信息.
在哪吒上启动Fedora的最简说明
预编译的镜像文件
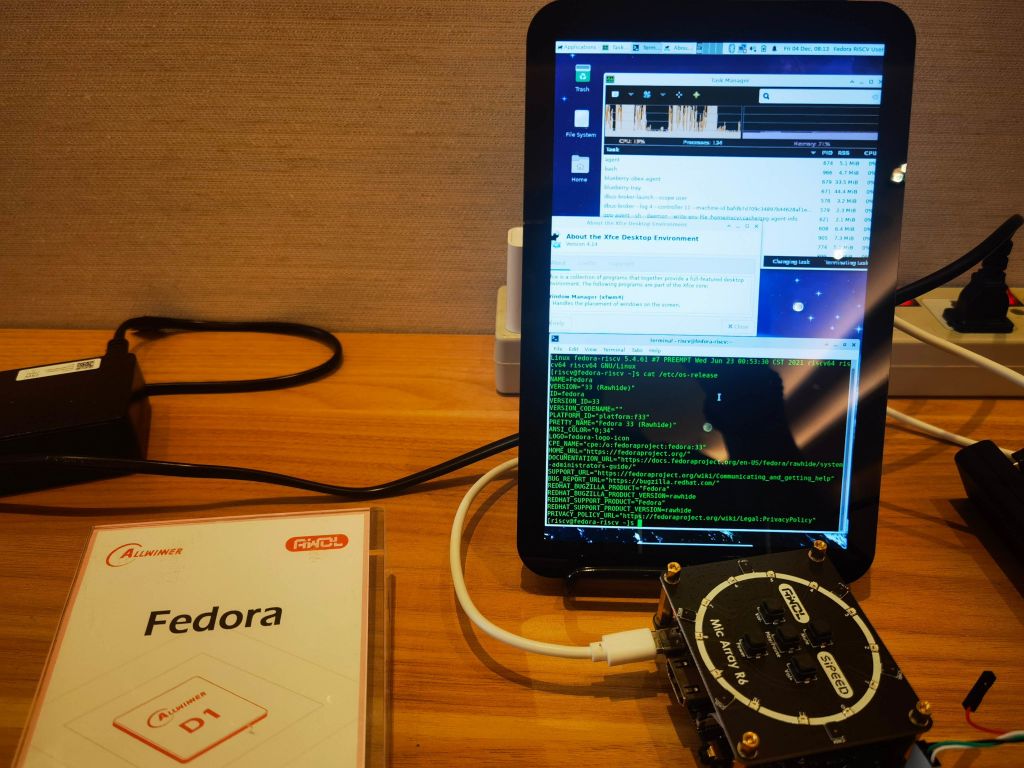
我们已经为您准备好一个可以在全志 D1上直接运行的预编译Fedora镜像文件: Fedora-riscv64-d1-developer-xfce-with-esp-Rawhide-20210723-173234.n.0-sda.raw.zst
您只需要做以下操作:
解压镜像文件
unzstd Fedora-riscv64-d1-developer-xfce-with-esp-Rawhide-20210723-173234.n.0-sda.raw.zst
写入一个TF卡 (必须大于或等于16GB)
sudo dd if=Fedora-riscv64-d1-developer-xfce-with-esp-Rawhide-20210723-173234.n.0-sda.raw of=/dev/sdX status=progress bs=4M
插入TF卡并上电
- 默认是在 LCD (竖屏)上显示:

- (可选) 转换到HDMI显示器上 (仅支持 1080p 模式竖屏)
cd /sys/kernel/debug/dispdbg
echo disp0 > name; echo switch1 > command; echo 4 10 0 0 0x4 0x101 0 0 0 8 > param; echo 1 > start;
硬件信息
IP 信息
平头哥: 玄铁 C906 RISC-V
Soc 和开发板信息
全志: D1 SoC 介绍
Sunxi: D1芯片
Sunxi: 全志哪吒开发板
软件

参考源码
最初源码来源
- 全志: 全志客户服务平台
为了获取源码,您需要注册并登录.
- 备选下载地址: 位于 SUNXI 网站上的 D1 资源
Smaeul的仓库
Tekkaman用于Fedora Image的仓库
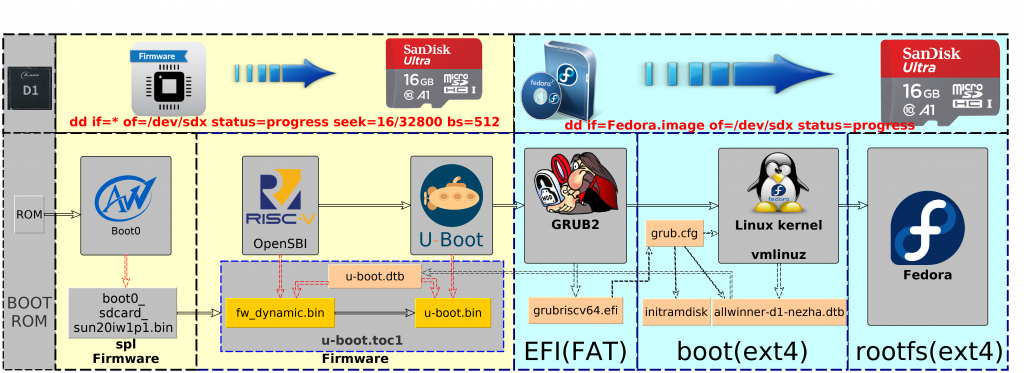
固件构建顺序

SPL(Boot0)
`boot0 或者 SPL (二级程序加载器) 是 BootROM 之后的第一个被执行的程序, 负责初始化内存控制器和加载下一级固件(来自于固态存储,闪存或者SD卡)。
使用可直接使用 Smaeul的SPL,也可以使用 Tekkaman 的fork
编译
git clone https://github.com/tekkamanninja/sun20i_d1_spl
pushd sun20i_d1_spl
git checkout origin/mainline
make CROSS_COMPILE=riscv64-linux-gnu- p=sun20iw1p1 mmc
popd
导入SD卡
pushd sun20i_d1_spl
sudo dd if=nboot/boot0_sdcard_sun20iw1p1.bin of=/dev/sdX bs=512 seek=16
OpenSBI
RISC-V 开源管理者模式(Supervisor)二进制接口, 类似 arm-TF
本文主要使用 Smaeul 的补丁, 但是会 rebase 到最新的主线上游 OpenSBI, 并修复可能出现的小问题。
编译
git clone https://github.com/tekkamanninja/opensbi -b allwinner_d1
pushd opensbi
CROSS_COMPILE=riscv64-linux-gnu- PLATFORM=generic FW_PIC=y make
popd
最终结果中的 build/platform/generic/firmware/fw_dynamic.bin 将在下面被放入 u-boot.toc1 。
U-boot
本文主要使用 Smaeul 的补丁, 但是会 rebase 到最新的主线上游 U-boot, 并使能更多的特性并添加一些运行时的默认环境变量来自动载入 GRUB。
编译
git clone https://github.com/tekkamanninja/u-boot -b allwinner_d1
pushd u-boot
make CROSS_COMPILE=riscv64-linux-gnu- ARCH=riscv nezha_defconfig
make CROSS_COMPILE=riscv64-linux-gnu- ARCH=riscv menuconfig
make CROSS_COMPILE=riscv64-linux-gnu- ARCH=riscv u-boot.bin u-boot.dtb
popd
最终生成的u-boot.bin 的 u-boot.dtb 将在下面被放入 u-boot.toc1 中.
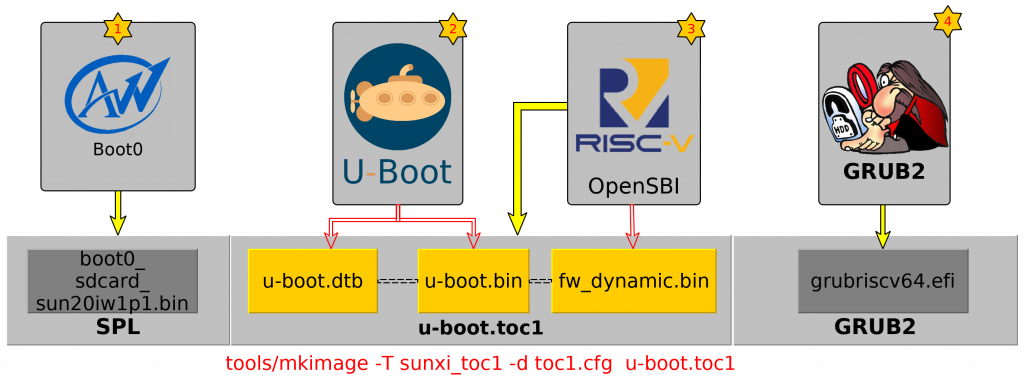
Build u-boot.toc1
- toc1.cfg:
[opensbi]
file = fw_dynamic.bin
addr = 0x40000000
[dtb]
file = u-boot.dtb
addr = 0x44000000
[u-boot]
file = u-boot.bin
addr = 0x4a000000
- build command:
pushd u-boot
cp ${PATH_TO_TOC1_CFG}/toc1.cfg ${PATH_TO_OPENSBI}/fw_dynamic.bin .
tools/mkimage -T sunxi_toc1 -d toc1.cfg  u-boot.toc1
popd
Flash u-boot.toc1 to SD card
pushd u-boot
sudo dd if=u-boot.toc1 of=/dev/sdX bs=512 seek=32800
GRUB for RISC-V
Please reference to this page: Architectures/RISC-V/GRUB2
You can build a grubriscv64.efi by following the page above. Then put it into the /EFI/ dir of the EFI partition of SD card.

Some example files in the boot partition:
/boot/uEnv.txt
bootcmd=load mmc 0:2 0x58000000 /EFI/fedora/grubriscv64.efi; bootefi 0x58000000
bootcmd_mmc0=devnum=0; run mmc_boot
/grub.cfg
set default=0
set timeout_style=menu
set timeout=3

set debug="linux,loader,mm"
set term="vt100"

menuentry 'Fedora vmlinux-5.15.0-rc1' {
        linux /vmlinuz-5.15.0-rc1 earlyprintk=sunxi-uart,0x02500000 console=ttyS0,115200 console=tty0 loglevel=8  root=/dev/mmcblk0p4 selinux=0 rhgb LANG=en_US.UTF-8
        devicetree /sun20i-d1-nezha.dtb
	initrd /initramfs-5.15.0-rc1.img
}
Linux kernel for Nezha D1 (WIP)
Using the patches from Smaeul/Ren Guo(T-HEAD)/Allwinner Engineers, enable almost all the features for Fedora,and also rebase to the latest upstream kernel master branch.
Important reference
WIP for Fedora
Note: We are still working on this for Fedora Image
Build Linux Kernel for D1
Checkout Source
git clone https://github.com/tekkamanninja/linux.git
pushd linux
git checkout origin/allwinner_nezha_d1_devel
popd
Config
pushd linux
make CROSS_COMPILE=riscv64-linux-gnu- ARCH=riscv nezha_fedora_defconfig
make CROSS_COMPILE=riscv64-linux-gnu- ARCH=riscv menuconfig
popd
Cross Build and install
# RISCV_ROOTFS_BOOT is the mount point of the boot partition in SD card
# RISCV_ROOTFS_BOOT=/run/media/../boot
# RISCV_ROOTFS  is the mount point of the Fedora rootfs partition in SD card
# RISCV_ROOTFS=/run/media/../rootfs
pushd linux
make CROSS_COMPILE=riscv64-linux-gnu- ARCH=riscv
make CROSS_COMPILE=riscv64-linux-gnu- ARCH=riscv INSTALL_PATH=${RISCV_ROOTFS_BOOT} zinstall
make CROSS_COMPILE=riscv64-linux-gnu- ARCH=riscv INSTALL_MOD_PATH=${RISCV_ROOTFS} modules_install
popd
How to Build RPM package for D1
using rpmbuild on QEMU
How to boot Fedora on QEMU, please reference Architectures/RISC-V/Build Bootable Image#Run_Fedora_on_QEMU
- Boot into Fedora on QEMU, then:
- prepare directory tree: Put spec file to /rpmbuild/SPECS and all source files to /rpmbuild/SOURCES
- For building RPM package:
#From spec file
$ rpmbuild -ba ~/rpmbuild/SPECS/pakcage.spec

#'''OR''' to build from an existing SRPM file:
$ rpmbuild -ra package.src.rpm
Please reference to How to Create a GNU Hello World RPM Package for more RPM info.
using mock with Qemu usermod
We also can build riscv64 RPMS on x86_64 machine by mock and Qemu usermode.[WIP]
How to Build your own Fedora Remix Image
Please reference to RISC-V: Build Bootable Image
How to make D1 as a Koji Builder
If we have already deployed a koji hub(like openkoji and oepkg),then we can add a Nezha D1 as koji builder.
For example:
Please follow the simple instruction below:
- NEED: koji CA certificate and builder authentication certificate: They are provided by koji hub admin.
- Install necessary packages
# dnf install koji-builder
- Modifying /etc/kojid.conf
- server=<koji hub XMLRPC server URL>
- topurl=<koji HTT file share URL>
- allowed_scms=<SCM repo rules>
- cert=<builder certificate>
- serverca=<koji CA certificate>
- Trust koji hub's CA cert
cp koji_ca_cert.crt /etc/pki/ca-trust/source/anchors/
update-ca-trust
- add host on koji hub (operated by koji hub admin)
koji add-host <hostname> riscv64
#The *hostname* should be same in authentication certificate.
- Enable and start kojid
systemctl enable --now kojid
- Verify koji builder online on koji hub (operated by koji hub admin):
koji list-hosts
# After initialization: The new added builder's status should be ready in the list.
- NOTICE:* builder won't ready until free space on /var/lib/mock is greater than 8GiB, and /var/lib/mock on NFS is not supported. Thus, using a high capacity SD card for builder and resize root file system to adapt all free space on SD is necessary.
