Lovenemesis (talk | contribs) |
Lovenemesis (talk | contribs) |
||
| Line 22: | Line 22: | ||
</pre> | </pre> | ||
= | = 使用 Eclipse Fedorapackager = | ||
从 Fedora 14 开始, Fedora 使用 Git 版本控制系统来跟踪需要打包的文件。参阅 [https://fedoraproject.org/wiki/Dist_Git_Project dist-git 文档] 来摄入了解 dist-git 的信息。幸运的是,dist-git 如何工作对于使用 Eclipse Fedora Packager plug-in 并不重要。和以往的 CVS 相比,Git 只是采取了略有不同的途径去完成打包工作。 | |||
== | == 初始设定 == | ||
这一步对于使用未设定 FAS 证书的新打包者只需要完成一次。如果确认已经完成过此设置并且正常的话,可以跳过此步骤。下面的步骤解释如何为[https://admin.fedoraproject.org/accounts/ FAS account] 设定这些证书。 | |||
首先,安装 <code>fedora-packager</code> RPM 包: | |||
<pre> | <pre> | ||
$ pkcon install fedora-packager | |||
</pre> | </pre> | ||
Revision as of 03:47, 23 October 2010
什么是 Eclipse Fedora Packager?
Eclipse Fedora Packager 是一个 Eclipse 插件。它帮助习惯于使用 IDE (比如 Eclipse IDE)的 Fedora 打包者们在 Eclipse 中完成 Fedora 打包 RPM 的工作,而无须纠结于命令行中(大多数情况 :-))。
Eclipse Fedora Packager 包含的部分功能为:
- 方便的 Git 克隆和分支切换
- 包含语法高亮、自动补全、更新日志完善的 RPM Spec 文件编辑器(快捷键 <Ctrl>+<Alt>+C)
- 下载代码包以及上传新代码包
- 准备本地编译(仅执行 spec 文件中的 %prep 部分)
- 按照当前 Spec 文件生成 SRPM 包
- 执行本地编译
- 推送至 Koji(Fedora 编译系统)
- Mock 编译
- 推送 Bodhi 更新
- Eclipse Git 支持(通过 EGit, 请参考 EGit 文档)
Eclipse Fedora Packager 自 F14 对于所有 Fedora 用户可用。想要尝试?使用如下命令来安装:
pkcon install eclipse-fedorapackager
使用 Eclipse Fedorapackager
从 Fedora 14 开始, Fedora 使用 Git 版本控制系统来跟踪需要打包的文件。参阅 dist-git 文档 来摄入了解 dist-git 的信息。幸运的是,dist-git 如何工作对于使用 Eclipse Fedora Packager plug-in 并不重要。和以往的 CVS 相比,Git 只是采取了略有不同的途径去完成打包工作。
初始设定
这一步对于使用未设定 FAS 证书的新打包者只需要完成一次。如果确认已经完成过此设置并且正常的话,可以跳过此步骤。下面的步骤解释如何为FAS account 设定这些证书。
首先,安装 fedora-packager RPM 包:
$ pkcon install fedora-packager
Then run the following command and simply follow the instructions provided:
$ fedora-packager-setup
Once this is done Eclipse Fedorapackager is ready for use. Fire up Eclipse. Let's get started. Yay!
Importing a Fedora Git Project
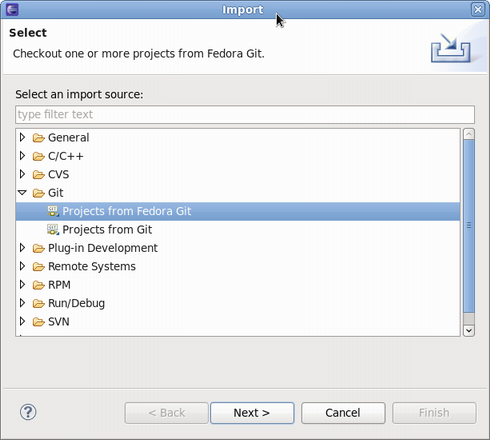
Getting started is easy. Go to "File" => "Import" => "Git" => "Projects from Fedora Git". This will clone the desired Git repository and create necessary local branches. For convenience, the "Git Repositories" view will also open once the clone process has finished.
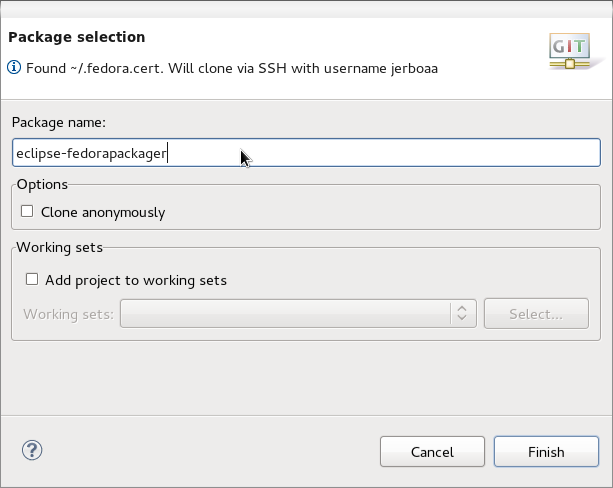
Here's how the Fedora Git import dialog looks like. Next, specify the package name that will then be prepared for you.
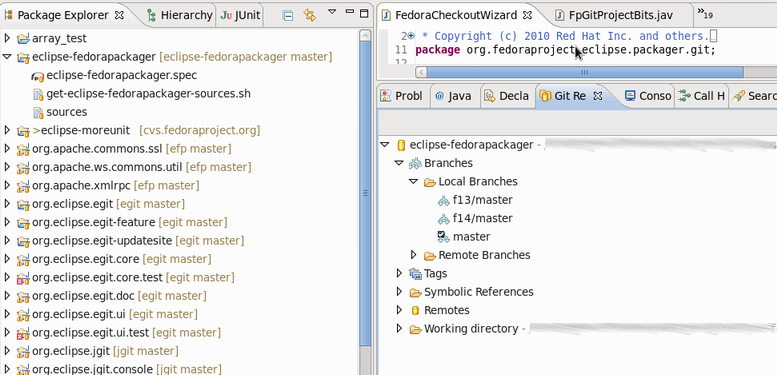
Once the new project has been created something akin to the following is seen. Note the branches in the Git Repository view and "[eclipse-fedorapackager master]" right beside the project name. In this case, eclipse-fedorapackager refers to the Git repository name and master to the currently checked out branch.
Fedora Packaging Work
After a Fedora Git project has been created, all files required for packaging the desired release can be found in the created Eclipse project directly. For example, files for release Fedora 13 correspond to files present in the Eclipse project one switched to branch f13/master. Files in branch master correspond to Fedora rawhide, the current development release of Fedora. The following is a brief description of things to consider doing while packaging up some software. Working in a different sequence works, but keep in mind that before trying a Koji build push your locally committed changes to the public repository.
Uploading Source Files Required for a Package
In order to upload new sources in Eclipse Fedora Packager, first download upstream sources and place the downloaded sources in the same folder as the Eclipse project. If this is done outside of Eclipse, don't forget to refresh the project afterwards (F5) so that the file actually shows up. A slick way to download sources is to use RPM editor functionality directly. See its documentation for more information on this. Once the new source file is available in the project, it can be uploaded to the lookaside cache by right-clicking on the file=> "Fedora Packager" => Upload This File => Replace/Add File. This either adds the file to the sources required to build the package or replaces the current content of the sources file to contain a single line with the MD5 sum of the file selected.
A valid certificate is required to upload to the lookaside cache. If it has expired, a new one can be created by issuing the following command on a terminal:
$ fedora-cert -n
Downloading Source Files Required for a Package
To download the required source files for an existing package in order to build it, right-click on the spec-file => "Fedora Packager" => Download Sources. This downloads all sources listed in the file sources.
Using the Spec-File Editor
Eclipse Fedora Packager uses the RPM Editor and ChangeLog plug-in from the Eclipse Linux Tools project (http://www.eclipse.org/linuxtools). For instance, a new ChangeLog entry can easily be created in the spec-file by using the <CTRL>+<ALT>+C keyboard shortcut (though a good idea is to set appropriate “ChangeLog” preferences first). Using <CTRL>+<SPACE> auto-completes locally installed packages. Also, rpmlint can be run by right-clicking on the spec-file => “Run Rpmlint”. For more information have a look at the spec-file editor screencast: http://www.eclipse.org/downloads/download.php?file=/technology/linuxtools/videos/specfile-demo.ogg or at the "Specfile Editor User Guide": Help => Help Contents => Specfile Editor User Guide.
Committing Changes to the Local Git Repository
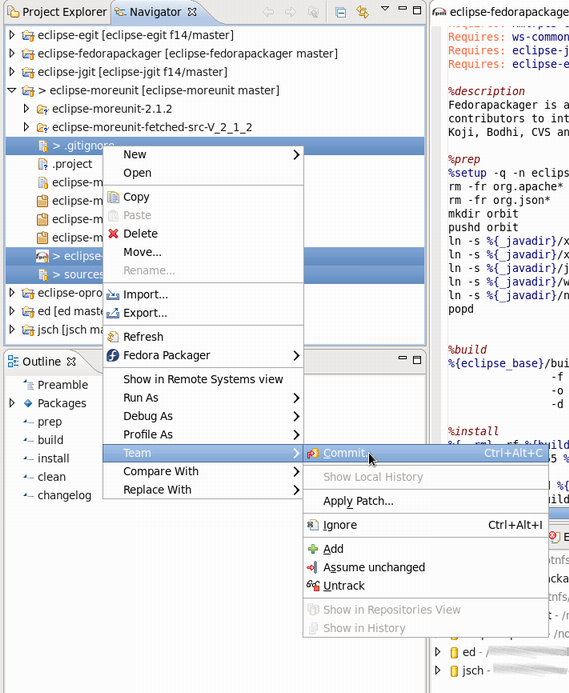
After the spec-file, patches etc. have been added/changed, commit those changes to the repository. This is done by:
- Selecting the files to commit (alternatively select the Fedora Git project and select desired unstaged files when the commit dialog is shown)
- Right-click, "Team" => "Commit..."
Switching Branches (Git Checkout)
Switching branches is as easy as double-clicking on the desired local branch to be worked on. The currently checked out branch is indicated to the left of the project name. Make sure to commit, revert, or stash changes before switching to a different branch. Refer to the Git and EGit documentation for more information on this.
Prepare Sources for a Local Build
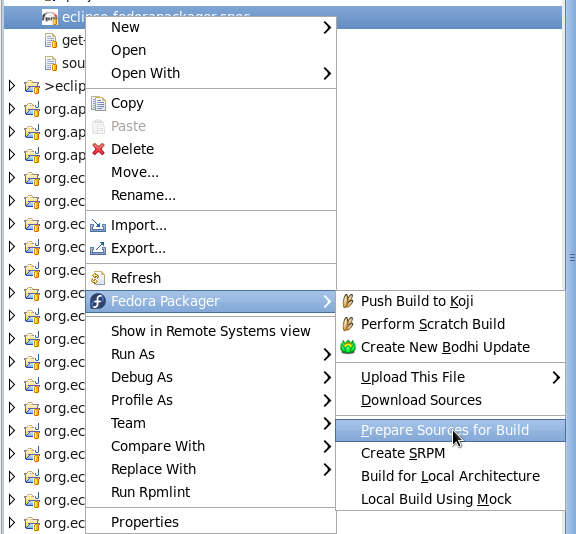
Eclipse Fedora Packager will download and prepare sources by right-clicking on the spec-file => “Fedora Packager” => “Prepare Sources for Build”.
Build RPM for a Local Architecture
This is a great way to test if the spec-file actually builds at all. Once the RPM has been successfully built locally, it is recommended further testing be carried out on the spec-file by completing a build in a chroot'ed environment using {{{mock}}}. Both ways are supported by Eclipse Fedora Packager.
The RPM can be built locally by selecting the spec-file => right-click => “Fedora Packager” => “Build for Local Architecture”. Output of the RPM build will appear on the Eclipse console.
Using mock-builds is a great way to test the “Requires/BuildRequires” of a spec-file. Select the spec-file => right-click => “Fedora Packager” => “Local Build Using Mock”. Be aware that this may take a long time (>20 minutes) and requires the mock package to be installed. Use Eclipse's “Run in Background” functionality for convenience.
Make Locally Committed Changes Public (Git Push)
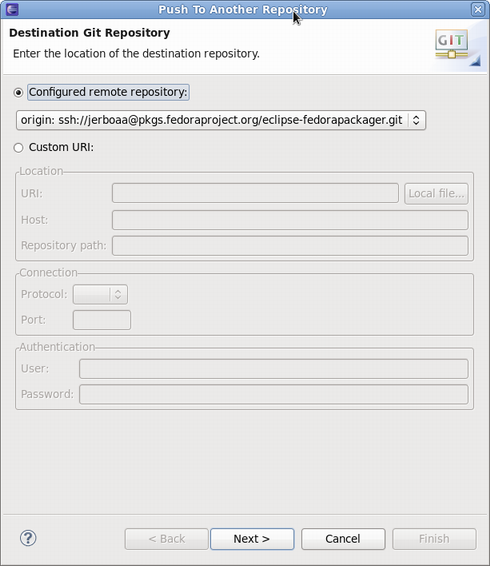
The changes are ready to be pushed (or published) publicly when the locally committed changes are satisfying. Remember, Git allows history to be rewritten before changes are made public. See the Git and EGit documentation for more information. To bring the local repository in sync with origin:
- Select the Fedora Git project
- Right-click, "Team" => "Push..."
- Select the Git repository to be pushed to (usually this is kept unchanged)
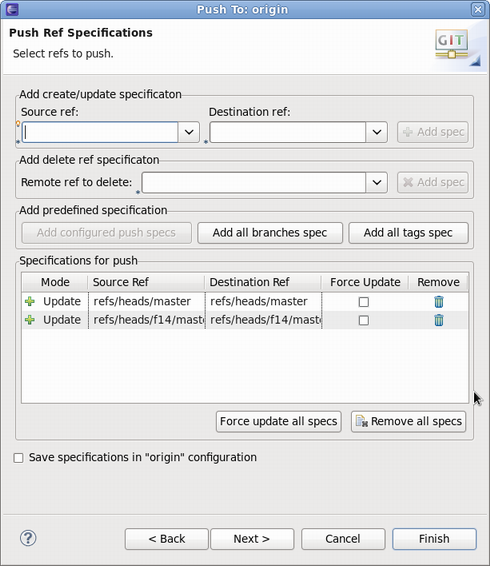
- Select the Git references to be pushed
- Carry out the push operation
The Git push dialog.
Select the Git references to push. In this example, branches master and f14/master will get pushed. Keep in mind that source and destination references are the same for Eclipse Fedora Packager. Clicking the “Add all branches spec” button is a convenience that pushes all commits to all local branches.
Pushing a Build to Koji
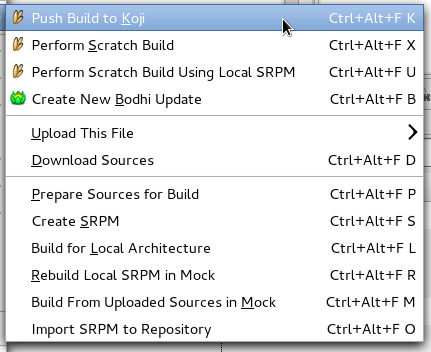
Once satisfied with a spec-file, upload the sources of the package, commit the changes to the local repository, and then push the local changes to the remote repository. When this is done, push a build to Koji by right-clicking the spec-file => “Fedora Packager” => “Push to Koji”.
Eclipse will pop up a message with the Koji URL to track your build. This is an example of how the message may look:
This should be enough information to track the builds.
Pushing a Bohi Update
After successfully building the RPMs, use Eclipse Fedora Packager to push an update for those packages. To do so, select the spec-file => right click => "Fedora Packager" => "Bodhi Update". When creating a Bodhi update using Eclipse Fedora Packager, similar information is required as needed by the Bodhi Web interface. Once an update has successfully been created, the pushed update will be visible on the Bodhi updates website. The status of updates can also be tracked there.
Feedback/Reporting Bugs
If a bug is found in the Eclipse Fedora Packager, please feel free to open a ticket at https://fedorahosted.org/eclipse-fedorapackager/report/1 (a FAS username is required to create tickets). Alternatively, try this query on RedHat Bugzilla in order to find already existing bugs. Thanks!

