| Line 190: | Line 190: | ||
! Context Menu Item !! Command Name (as shown when <code>CTRL+ALT+F</code> was pressed) !! Keyboard Short-Cut !! Description | ! Context Menu Item !! Command Name (as shown when <code>CTRL+ALT+F</code> was pressed) !! Keyboard Short-Cut !! Description | ||
|- | |- | ||
|style="width: 300px;"| Push Build to Koji || Koji Build || <code>CTRL+ALT+F K</code> || Pushes a regular build to Koji. Checks if there are unpushed changes in the local Git repository prior pushing the build. The build will create an SRPM based on what has been committed and pushed to the Fedora Git repository as well as based on the sources which have been uploaded to the lookaside cache. The target is determined based on the current branch (e.g. master, f15, etc). Once a build has been pushed and was successful, the package will get tagged and will become automatically available in the next Fedora release. | |style="width: 300px;"| Push Build to Koji ||style="width: 150px;"| Koji Build ||style="width: 90px;"| <code>CTRL+ALT+F K</code> || Pushes a regular build to Koji. Checks if there are unpushed changes in the local Git repository prior pushing the build. The build will create an SRPM based on what has been committed and pushed to the Fedora Git repository as well as based on the sources which have been uploaded to the lookaside cache. The target is determined based on the current branch (e.g. master, f15, etc). Once a build has been pushed and was successful, the package will get tagged and will become automatically available in the next Fedora release. | ||
|- | |- | ||
| Perform Scratch Build || Koji Scratch Build || <code>CTRL+ALT+F X</code> || Pushes a scratch build to Koji. Very similar to the above. Checks if there are unpushed changes in the local Git repository prior pushing the build. Scratch builds won't get tagged, though. | | Perform Scratch Build || Koji Scratch Build || <code>CTRL+ALT+F X</code> || Pushes a scratch build to Koji. Very similar to the above. Checks if there are unpushed changes in the local Git repository prior pushing the build. Scratch builds won't get tagged, though. | ||
Revision as of 15:20, 12 August 2011
What is Fedora Packager for Eclipse?
Fedora Packager for Eclipse is a plug-in for Eclipse that has been available for Fedora users since F14. It helps Fedora packagers, to package their Fedora RPMs from within Eclipse without needing to resort to the command line (at least for the most part). Think of Fedora Packager for Eclipse as a GUI for fedpkg, although it does not use it under the covers.
First, install Fedora Packager for Eclipse:
yum install eclipse-fedorapackager
Some features included in Fedora Packager for Eclipse are:
- Conveniently clone Fedora Git projects
- RPM .spec file editor with syntax highlighting, auto-completion of package names for Requires/BuildRequires templates,
%changelogsupport (Ctrl+Alt+ckeyboard shortcut), etc. - Download source files and upload new source files
- Prepare local builds (execute
%prepsection of your .spec file only) - Create source RPMs based on current .spec file
- Perform local builds
- Push builds to Koji (the Fedora build system)
- Mock builds
- Push Bodhi updates
- Create a local Fedora RPM Project to ease the process of introducing a new Fedora package
- Eclipse Git support (via EGit, please refer to EGit documentation)
Feel free to skip the next section if you are an existing maintainer and also know how to create a new software for Fedora.
Getting Started as Maintainer for a New Fedora Package
If you haven't previously packaged software for Fedora, this guide will lead you through your first package submission.

Creating Account for New Contributors
If you are a new package maintainer:
Creating a new account in Fedora Account System
- First step is to create account in Fedora Account System (FAS).
- Click New account and fill in the blanks.
- After you create your account, please be sure to sign the CLA (if you click on the My Account link in the top right, you should see
CLA: CLA Done). - Also you need to upload a public
RSA SSH key. You need to use the matching private key to access Fedora machines via SSH.- Here is information on creating SSH key.
Creating a Bugzilla Account
Create an account in Red Hat bugzilla.
- The email address that you use for your bugzilla account should be the same email address as you use in the Fedora Account System for all things related to fedora packaging.
- To make you work and your bug tracking easier, there is a task management plug-in for eclipse called Mylyn. You can follow these instructions on how to integrate your bugizlla account with your mylyn plug-in in eclipse.
Initial Setup
This step is only required to be completed once for a new Fedora packager or if using a new machine that does not have the required FAS certificates set up. When it is certain this is correct it is safe to skip this step. The following explains how to set up those certificates for an FAS account.
- First, install the
fedora-packagerRPM package:
yum install fedora-packager
- Then run the following command and follow the instructions provided:
fedora-packager-setup
Feel free to skip the next section if you are an existing maintainer and also know how to create a new software for Fedora.
Making a Package
Packaging Guidlines
- If you don't know how to create an RPM package, refer to the tutorial at A Short RPM Tutorial or the more advanced and much more detailed how to create an RPM package.
- Make sure it is a new package. Check this list of existing packages.
- Make sure it is a suitable package. Read Packaging Guidelines and Packaging Naming Guidelines.
- Read some other package submissions to learn about packaging and gain familiarity with the process and requirements. One way of doing this is to join the package-review@lists.fedoraproject.org mailing list.
Creating an RPM package:
To start with creating an RPM package using Eclipse, perform the steps in creating Local Fedora Packager Project of the user guide. Note that you can populate your project using one of these three options:
- 1. Using RPM Stubby on
feature.xmlorpom.xml. - 2. Extract .spec file and resources by importing an existing SRPM file to the project.
- 3. Start a plain project using Specfile template.
After you created the project, you can use rpm build commands available through the local context menu to build the package and create SRPM file. In next step you need to submit your .spec file and your SRPM file for review.
Submiting For Review
Introduce Yourself Using Fedora Mailing Lists
When a new package maintainer joins the Fedora Project, we request that he/she stays close to upstream. Inform the developers that you are packaging the software by introducing yourself on the devel@lists.fedoraproject.org.
To sign up for the list, visit the devel list signup page.
- The primary purpose of this is to begin the process of building trust by learning about the package maintainer and increase the chances of your review request being processed sooner.
- The purpose of all this is to break anonymity and foster real-world community within the project. You are under no obligation to reveal personal secrets. The objective is to establish a level of trust with yourself and the other members of the project.
- Subject: Self Introduction
- Body: Add any information you believe is applicable including past experience, a link to the review request you have filed and a brief description of yourself. You can also post your GPG key information if you want to.
- Here is the information of possible mailing lists for you to join. And there is also a list of special interest groups for Fedora Packaging.
Uploading the Package
Upload your SRPM and .spec files onto the Internet somewhere. This can be anywhere accessible by a URL.
- If you need hosting space, please make a note of it in your ticket submission and someone will take care of you.
- If you have already got a Fedora Account then you can use your storage at
<user-name>.fedorapeople.orgfor this.
Example:
scp path/to/file.spec path/to/rpm-file.src.rpm <user-name>.fedorapeople.org:public_html
file.spec and rpm-file.src.rpm will then be available via the following URLs:
   http://<user-name>.fedorapeople.org/file.spec
   http://<user-name>.fedorapeople.org/rpm-file.src.rpm
Creating Review Request
Before submitting your request, be sure there is not a previous request for the same package.
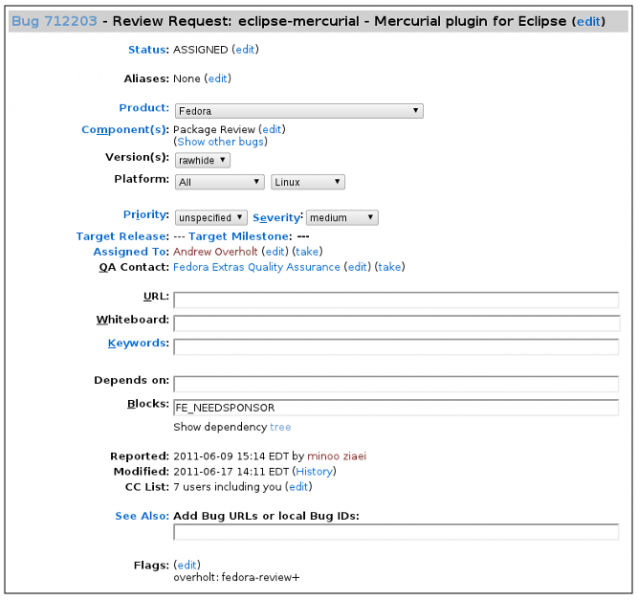
Fill out this form in bugzilla.
- 1. Make sure that you put the name of the package (excluding version and release numbers) in the Review Summary field, along with a very brief summary of what the package is.
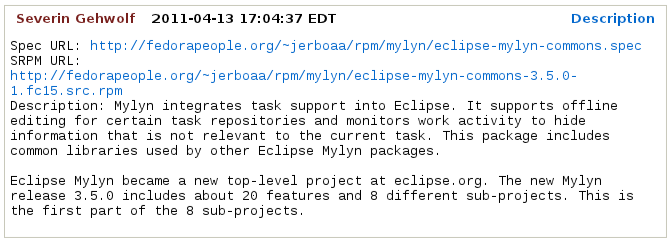
- 2. Put a description of your package (usually, this can be the same thing as what you put in the spec
%description) in the Review Description field. - 3- Obtain member sponsorship: If this is your first package, or you are a new maintainer who is updating a package, explain it and say that you need a sponsor (you will need sponsorship to check in and build your package).To be able to get sponsored, you should enter FE-NEEDSPONSOR into the Blocks field.
- Sponsorship is not automatic and may require that you further participate in other ways in order to demonstrate your understanding of the packaging guidelines.
- Key to becoming sponsored is to convince an existing sponsor-level member that you understand and follow the project's guidelines and processes.
- For more information check this How to get sponsored user guide.
- 3. Include the URLs to your SRPM and .spec files.
Bugzilla feedback
- You should get notifications of changes by email. Fix any blockers that the reviewer(s) point out.
Ready to Ship
Follow these steps after your package is approved by reviewers.
Requesting a new package SCM
When the package is approved by the reviewer, request a git module and branches with the info on Source Code Management(SCM) admin requests.
- Requests that require package administrators approval may be requested through the fedora-cvs flag in Bugzilla tickets. Changing the fedora-cvs flag to "?" in a Bugzilla report means admin attention is needed.
- Mention the name of the branches you need your package to be included in.
Fedora Packager Import Wizard
Once the Fedora Git repository has been created for you, you can import it in Eclipse.
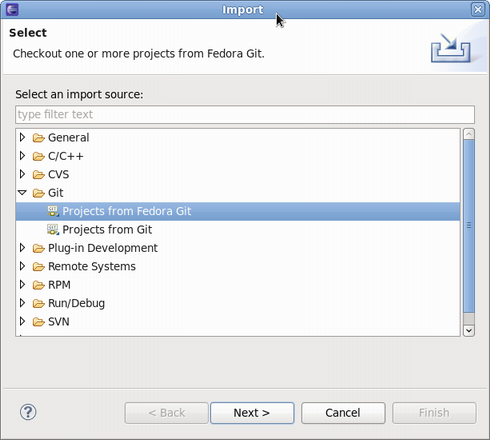
- Go to File > Import > Git > Projects from Fedora Git (Alternatively use keyboard short-cut
CTRL+ALT+F Iand enter your package name when prompted. This will clone the desired Git repository. Refer to this user guide on Using Fedora Git for more information. - For convenience, the Git Repositories view will also open once the clone process has finished.
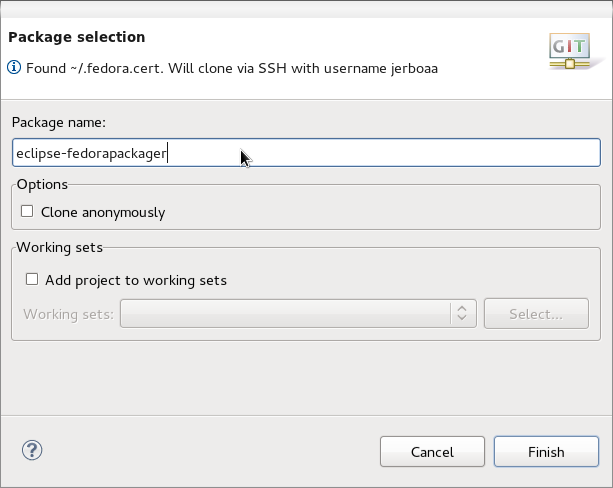
- Here's what the Fedora Git import dialog looks like. Next, specify the package name that will then be prepared for you.
- Since you are cloning your new empty git repository, you will just see the sources file in your cloned package directory.
Updating the SCM
Importing and Committing the Package Contents
After you have checked out your empty git module, you need to import and commit your package contents into the master branch.
- 1. Right-click on your source files in the SOURCES folder of your local RPM project in Eclipse and click Copy.
- 2. Right-click on your cloned project from Fedora Git and click Paste.
- 3. To upload these upstream source files to the lookaside cache, right-click on them, select Fedora Packager > Upload this File > Add to Existing Sources. This adds the files to the list of source files required to build the package. Use Fedora Packager > Upload this File > Replace Sources in order to replace the current content of the sources file to contain a single line with the MD5 sum of the file selected. More information about the lookaside cache can be found in this document.
- 4. Repeat steps 1-2 for your .spec file in SPECS folder.
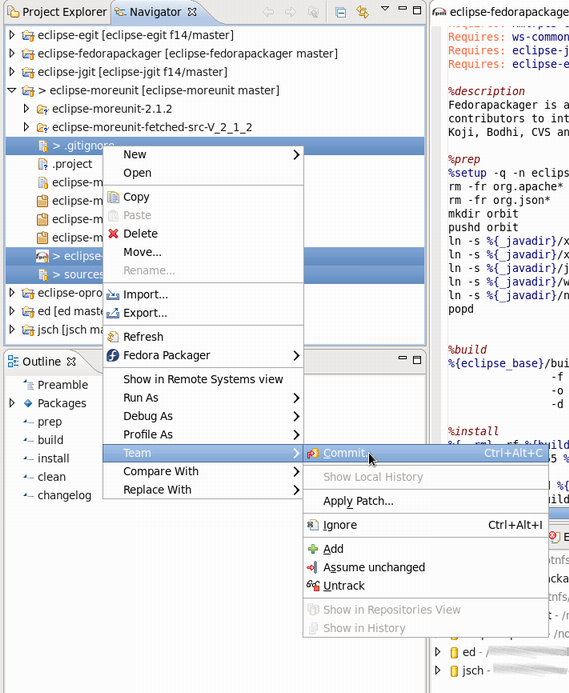
- 5. To commit the package contents to the git repository, select the source file and the .spec file to commit (alternatively select the Fedora Git project and select desired unstaged files when the commit dialog is shown), right-click, Team > Commit...
- Use this message for your initial commit: "
Initial import (#nnnnnn)" (where nnnnnn is your Bugzilla package review bug number).
Building the Package
- Now you can build your package locally using Fedora Packager's features.
Closing the Bugzilla Ticket
- If your package was built successfully, you should close it as NEXTRELEASE.
Updating Your Package
Once you have built your package locally, you can perform the following steps to update your package:
- To be able to include your builds in all releases, make sure to read these instructions.
Continue with next steps in this user-guide to be able to use all available features of Fedora Packager plug-in.
Enabling Upstream Release Monitoring
Fedora has infrastructure available for monitoring new upstream releases of the software you are packaging.
- Refer to Upstream Release Monitoring for more details.
- Learn to handle updates by reading the Package update HOWTO.
Using Fedora Packager for Eclipse
Before continuing with this part, make sure you have read our initial setup instructions. Moreover, please make sure your FAS SSH keys are properly configured in Eclipse.
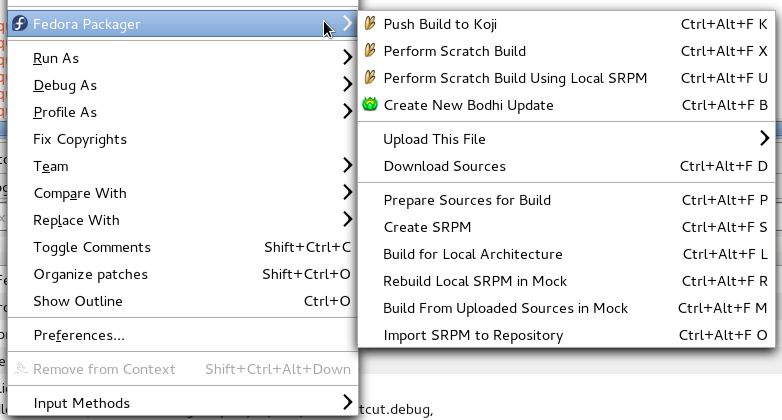
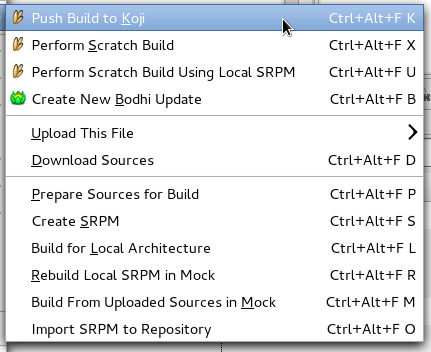
Most of the features of Fedora Packager for Eclipse are accessible via its context menu or keyboard short-cuts. The richest context menu is available if you imported a Fedora Git package. A subset of this functionality is also available for Fedora RPM projects. The former is intended for Fedora package maintainers and the latter is useful for creating a new Fedora package, which is not yet part of the Fedora distribution.
Context Menu
The Fedora Packager context menu should be available if you:
- 1. Right-click on a project which got imported via the Import from Fedora Git wizard or a smaller subset for projects created with the Fedora RPM Project wizard.
- 2. Right-click on a .spec file which is contained in a Fedora Packager project (e.g. in the Project Explorer).
- 3. Right-click in the .spec file itself, while editing it.
Available Keyboard Short-Cuts
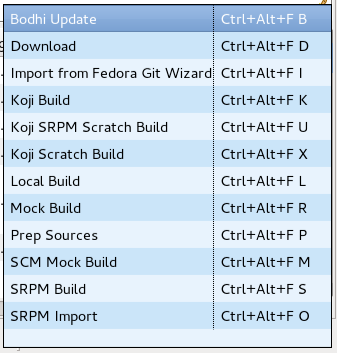
As of Fedora Packager 0.2 available Fedora Packager for Eclipse actions have corresponding keyboard short-cuts. All available short-cuts are shown if you press CTRL+ALT+F. Note that keyboard short-cuts work on the package which is associated with the currently open .spec file (with the exception of importing a new Fedora Git package, CTRL+ALT+F I.
Fedora Packager for Eclipse Actions
The following table describes all Fedora Packager for Eclipse commands in more detail.
| Context Menu Item | Command Name (as shown when CTRL+ALT+F was pressed) |
Keyboard Short-Cut | Description |
|---|---|---|---|
| Push Build to Koji | Koji Build | CTRL+ALT+F K |
Pushes a regular build to Koji. Checks if there are unpushed changes in the local Git repository prior pushing the build. The build will create an SRPM based on what has been committed and pushed to the Fedora Git repository as well as based on the sources which have been uploaded to the lookaside cache. The target is determined based on the current branch (e.g. master, f15, etc). Once a build has been pushed and was successful, the package will get tagged and will become automatically available in the next Fedora release. |
| Perform Scratch Build | Koji Scratch Build | CTRL+ALT+F X |
Pushes a scratch build to Koji. Very similar to the above. Checks if there are unpushed changes in the local Git repository prior pushing the build. Scratch builds won't get tagged, though. |
| Perform Scratch Build Using Local SRPM | Koji SRPM Scratch Build | CTRL+ALT+F U |
Pushes a scratch build to Koji. Koji will use the provides SRPM for the build (i.e. it won't use anything from the Fedora Git repository or lookaside cache. As with all scratch builds, it won't get tagged. |
| Create New Bodhi Update | Bodhi Update | CTRL+ALT+F B |
Pushes builds which are available in Koji as an update. Updates will usually get pushed to testing and will move to the stable repository. This action checks if there are unpushed changes on the current branch and may prompt for the SSH passphrase as well as for your Eclipse secure storage master password should you have requested Eclipse to store your Bodhi password on a previous update push. It will validate your FAS credentials prior presenting you with the update dialog. The list of builds will get populated with the binary RPMs which the current .spec file produces (again, the Fedora release is based on the currently checked out branch). Additional builds to get pushed as a single update may be added manually. |
| Upload This File => Add to existing sources | N/A | N/A | Uploads the currently selected file (the file on which the right-click occurred) to the lookaside cache. Appends an entry to the sources file. Only archive files should get uploaded to the lookaside cache. No text files are permitted such as .spec, .xml, .patch, etc. Add, commit and push them to the Fedora Git repository instead. |
| Upload This File => Replace existing sources | N/A | N/A | Uploads the currently selected file (the file on which the right-click occurred) to the lookaside cache. Replaces any existent content in the sources file (i.e. the uploaded file will be the only entry). Only archive files should get uploaded to the lookaside cache. No text files are permitted such as .spec, .xml, .patch, etc. Add, commit and push them to the Fedora Git repository instead. |
| Download Sources | Download | CTRL+ALT+F D |
Downloads all files as listed in the sources file from the lookaside cache. Does not download files again if already existent in the relevant folder, unless its MD5 checksum mismatches with what's in the sources file. |
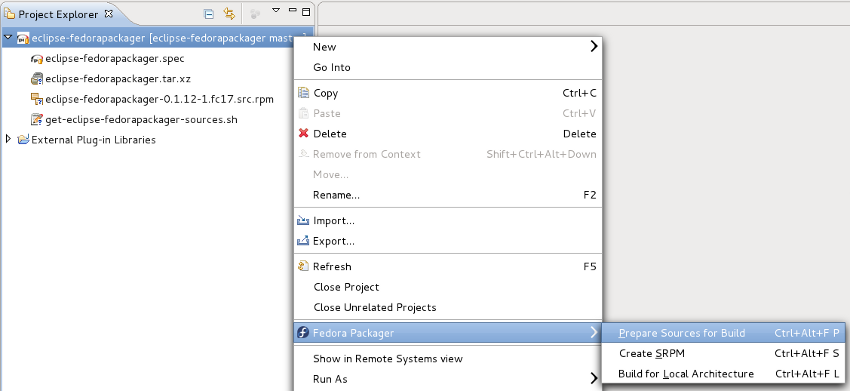
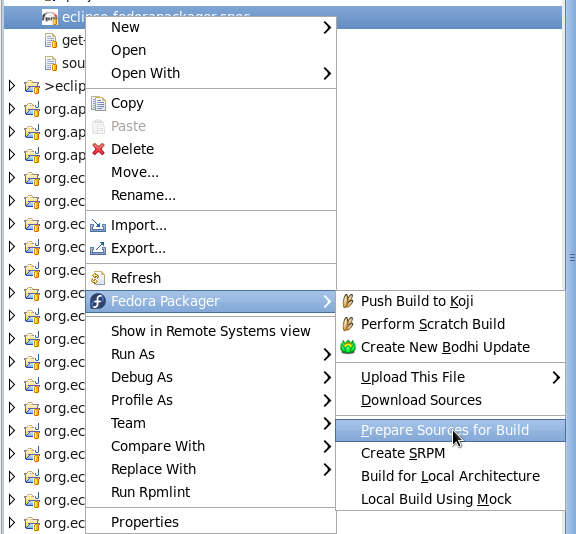
| Prepare Sources for Build | Prep Sources | CTRL+ALT+F P |
Execute the %prep section in the .spec file. This will download sources from the lookaside cache if sources are not yet in the containing folder. Note that this behaviour is slightly different for a Fedora RPM project, since downloading from the lookaside cache is not applicable in this case. |
| Create SRPM | SRPM Build | CTRL+ALT+F S |
Create an SRPM based on the current snapshot of the .spec file and the current Git branch one is on. This will download sources from the lookaside cache if sources are not yet in the containing folder. Note that this behaviour is slightly different for a Fedora RPM project, since downloading from the lookaside cache is not applicable in this case. |
| Build for Local Architecture | Local Build | CTRL+ALT+F L |
Build binary RPMs based on the current snapshot of the .spec file and the current Git branch one is on. This will download sources from the lookaside cache if sources are not yet in the containing folder. Note that this behaviour is slightly different for a Fedora RPM project, since downloading from the lookaside cache is not applicable in this case. |
| Rebuild Local SRPM in Mock | Mock Build | CTRL+ALT+F R |
Rebuild the SRPM which has to be specified by the user in a mock chroot based on the current Git branch one is on. |
| Build From Uploaded Sources in Mock | SCM Mock Build | CTRL+ALT+F M |
Rebuild the package in a mock chroot based on the current Git branch one is on. This will only use sources as they are available in the pushed Fedora Git repository and the lookaside cache. This won't work if the machine is offline. |
As mentioned earlier, as of Fedora Packager for Eclipse 0.2 there are two options for creating Fedora packaging projects:
- 1. Importing an existing Fedora Git project. This should be used for package maintenance.
- 2. Create a new Fedora RPM project for a package not yet in Fedora
First, we'll describe how Fedora Packager for Eclipse can be used for creating a new Fedora package. This is handy if you decided to become a new package maintainer and would like to submit a package for review. The Fedora RPM Project option of Fedora Packager for Eclipse 0.2, will help you walk you through the process and will make some parts of it easier for you.
Creating a Local Fedora RPM Project
- 1. Select New > Fedora > Fedora RPM Project and click Next.
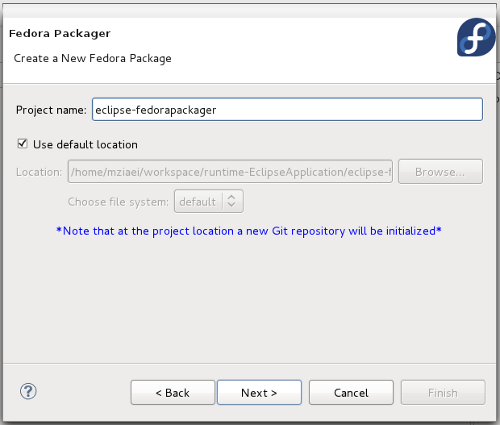
- 2. Type the name of your desired package name in Project name and click Next.
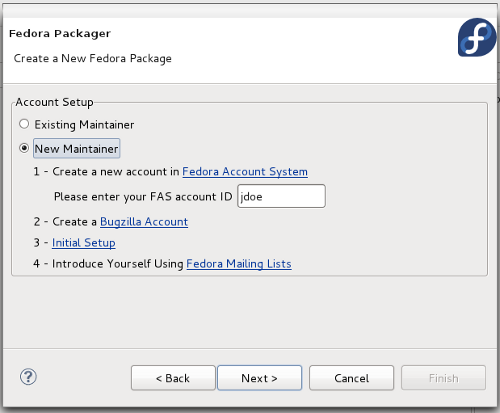
- 3. Select the option that matches you:
- If you are an Existing maintainer, select this option and click Next.
- If you are a New maintainer', make sure you follow all the mentioned steps to complete your account setting. Once you are finished you can type in your FAS Account ID and click Next.
- 4. You can start the project in three different ways:
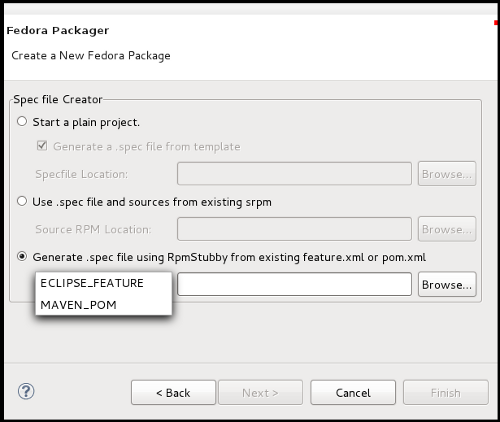
- 4.a. Create project using Rpm Stubby
- If you have an Eclipse-feature or Maven-Pom, you can select first option to start your project using RPM Stubby. From the drop down list:
- Select ECLIPSE_FEATURE to upload an existing feature.xml file to your project.
- Or select MAVEN_POM to upload an existing pom.xml file to your project.
- If you have an Eclipse-feature or Maven-Pom, you can select first option to start your project using RPM Stubby. From the drop down list:
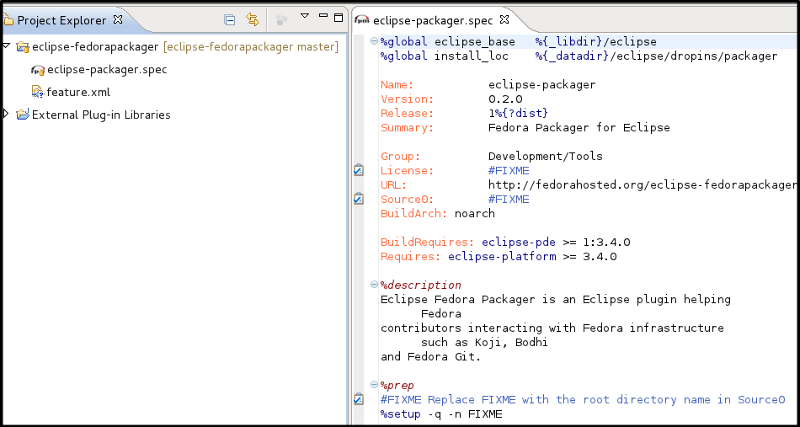
- Select your file and click Finish.
- Your project content and your generated Specfile should look like this:
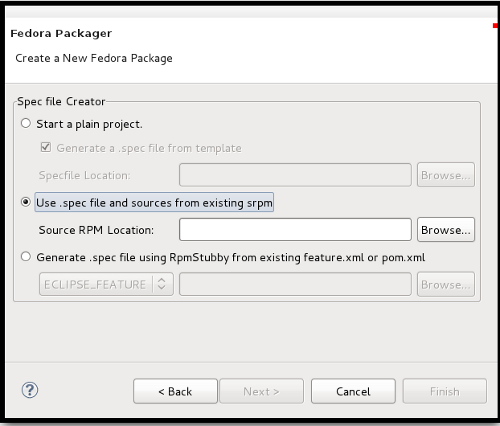
- 4.b. Use existing .spec file and sources by importing SRPM file
- If you have already an SRPM, you can upload it to your workspace and the Specfile and sources will be extracted from SRPM.
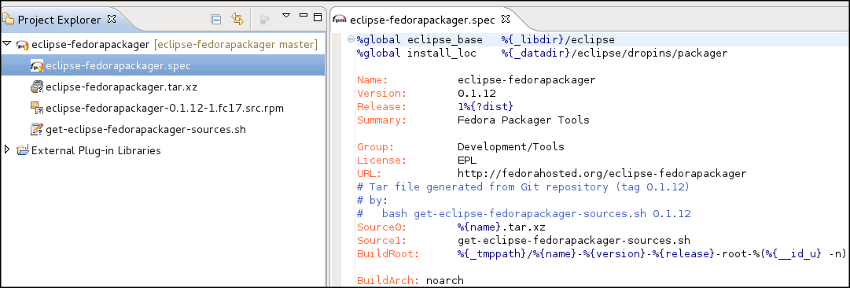
- Select your SRPM file and click Finish.
- Your project content and your generated specfile should look like this:
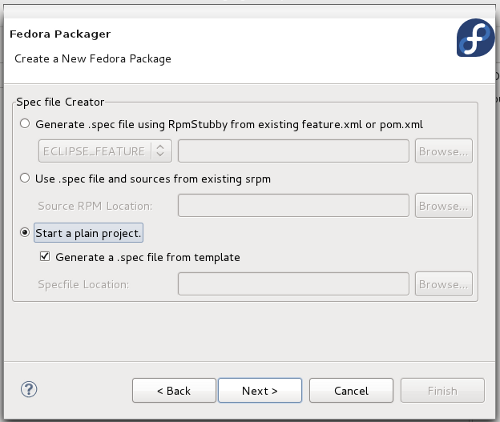
- 4.c. Start a plain project
- Select this option to start your project by creating a Specfile from template. Click Next.
- Apply any necessary changes and click Finish.
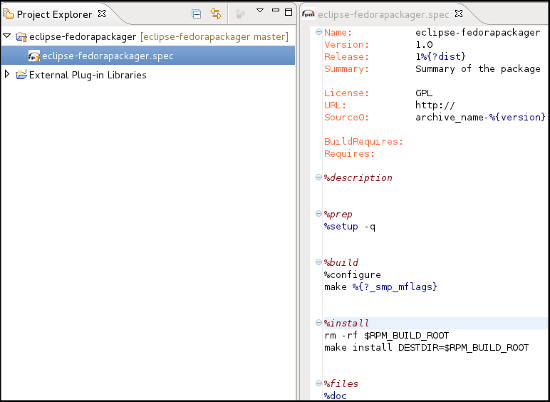
- Your project content and your generated specfile should look like this:
- 5. At the end of creating the project, you will be asked to open the project in the Fedora Packager Perspective.
Your project will be a local Git repository which has been initialized with the Specfile. The new repository will be automatically opened in the Git Repository View as part of the Fedora Packager Perspective.
Importing a Fedora Git Project
Once you are a sponsored Fedora packager you can import Fedora Git packages as follows. Before doing so make sure you've run fedora-packager-setup and configured your FAS SSH keys in Eclipse.
- 1. Select Import > Git > Projects from Fedora Git and click Next. Alternatively, you can use the keyboard short-cut
CTRL+ALT+F I - 2. Type the name of the package in Package name.
- You can find screenshots of these steps in Fedora Packager Import Wizard section of this user guide.
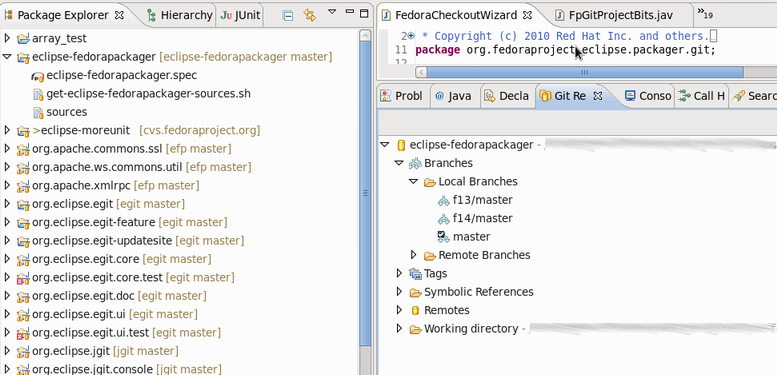
- 3. Once the new project has been created something akin to the following is seen.
- In this case, eclipse-fedorapackager refers to the Git repository name and master to the currently checked out branch.
- In this case, eclipse-fedorapackager refers to the Git repository name and master to the currently checked out branch.
Fedora Packaging Work
After a Fedora Git project has been created, all files required for packaging the desired release can be found in the created Eclipse project directly. For example, files for release Fedora 13 correspond to files present in the Eclipse project, once switched to branch f13. Files in branch master correspond to Fedora rawhide, the current development release of Fedora. All the development should be done in this branch and once it's done you can checkout to another desired branch and rebase that branches on top of master. Then push them together to the upstream.
The following is a brief description of things to consider doing while packaging up some software.
Uploading Source Files Required for a Package
- In order to upload new sources in Fedora Packager for Eclipse, first download upstream sources and place the downloaded sources in the same folder as the Eclipse project. If this is done outside of Eclipse, don't forget to refresh the project afterwards (F5) so that the file actually shows up. A slick way to download sources is to use Specfile Editor functionality directly.
- Once the new source file is available in the project, it can be uploaded to the lookaside cache by right-clicking on your file, Fedora Packager > Upload This File > Replace/Add Existing Sources. This either adds the file to the sources required to build the package or replaces the current content of the
sourcesfile to contain a single line with the MD5 sum of the file selected. - A valid certificate is required to upload to the lookaside cache. If it has expired, a new one can be created by issuing the following command in a terminal:
$ fedora-cert -n
Downloading Source Files Required for a Package
To download the required source files for an existing package in order to build it:
- Right-click on the .spec file and select Fedora Packager > Download Sources. This downloads all sources listed in the file
sources.
Using the Specfile Editor
Fedora Packager for Eclipse uses the RPM Specfile Editor and ChangeLog plug-in from the Eclipse Linux Tools project.
For instance, a new ChangeLog Entry can easily be created in the .spec file by using the Ctrl+Alt+c keyboard shortcut or by clicking Edit > ChangeLog Entry (though a good idea is to set appropriate ChangeLog Preferences first). Also, rpmlint can be run by right-clicking on the .spec file and selecting Run Rpmlint.
For more information have a look at the .spec file editor screen-cast, or at the Specfile Editor User Guide.
Committing Changes on the Local Git Working Directory
After the .spec file, patches, etc. have been added/changed, commit those changes to the repository. This is done by:
- Selecting the files to commit (alternatively select the Fedora Git project and select desired unstaged files when the commit dialog is shown)
- Right-click, Team > Commit...
Switching Branches (Git Checkout)
Switching branches is as easy as double-clicking on the desired local branch to be worked on.
- The currently checked-out branch is indicated to the left of the project name.
- Make sure to commit, revert, or stash changes before switching to a different branch.
- Refer to the Git and EGit documentation for more information on this.
Building the Package Locally
Preparing Sources for Build
Fedora Packager for Eclipse will download and prepare sources for building a package.
- Select your .spec file, right-click, Fedora Packager > Prepare Sources for Build.
Building RPM for a Local Architecture
This is a great way to test if the .spec file actually builds at all. Once the RPM has been successfully built locally, it is recommended further testing be carried out on the .spec file by completing a build in a chroot environment using mock. Both ways are supported by Fedora Packager for Eclipse.
- To build the RPM locally right-click on the .spec file and select Fedora Packager > Build for Local Architecture. Output of the RPM build process will appear in the Eclipse Console view.
Using mock to build your package is a great way to verify that you have the correct BuildRequires in a .spec file.
- To build the RPM locally using mock, right-click on the .spec file and select Fedora Packager > Local Build Using Mock. Be aware that this may take a long time and requires the mock package to be installed. Use Eclipse's Run in Background functionality for convenience.
Make Locally Committed Changes Public (Git Push)
When you are satisfied with your locally-committed changes, you are ready to publish them publicly. Remember, if you made any mistake in your commits, Git allows history to be rewritten before changes are made public. See the Git and EGit documentation for more information.
To bring the local repository in sync with the remote repository (which is by default called origin):
- 1. Right-click on the Fedora Git project, click Team > Remote > Push...
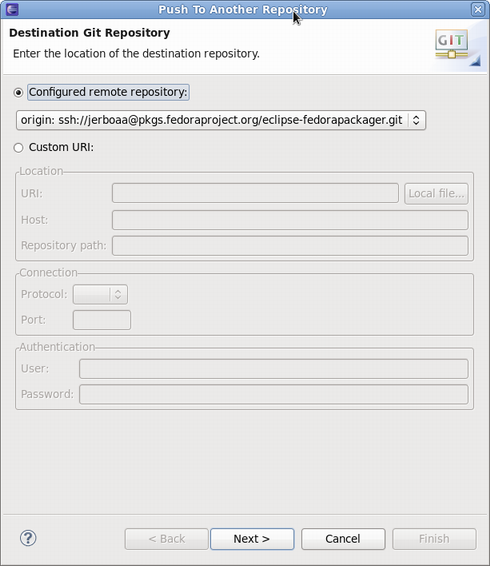
- 2. Select the Git repository to which you would like to push (usually this is kept unchanged), click Next.
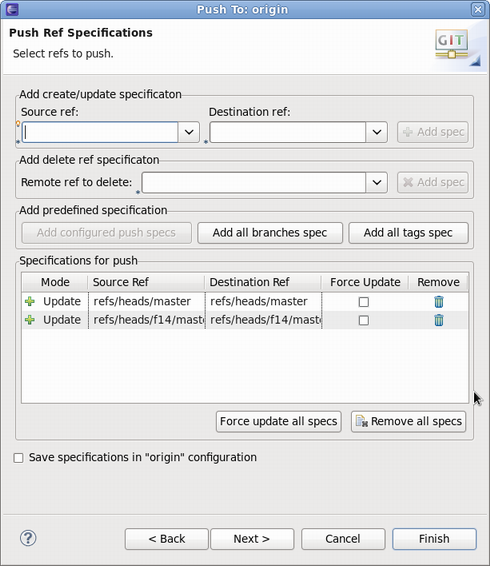
- 5. Select the Git references to push.
- In this example, branches master and f14/master will get pushed. Keep in mind that source and destination references are the same for Fedora Packager for Eclipse.
- Clicking the Add all branches spec button is a convenience way that pushes all commits to all local branches.
- 4. Carry out the push operation
Pushing a Build to Koji
- Keep in mind that before trying a Koji build push your locally committed changes to the public repository
- To push a build to Koji, right-click on the .spec file, select Fedora Packager > Push to Koji.
- Eclipse will pop up a message with the Koji URL to track your build. This is an example of how the message may look:
- If you get an error, your certificate is probably expired. To create a new one, type "
$fedora-cert -n" in a terminal. - If you click on the provided URL, a browser tab will open in Eclipse showing you the contents of the koji status page. Refresh it as you like to follow build progress.
- You can find more information on Koji build in this page.
Pushing a Bodhi Update
If this package will be built for any version of Fedora that is already released, please submit it for inclusion in the fedora-updates repository for those versions of Fedora. For doing this:
- Switch to the appropriate git branch on Git Repositories view.
- Commit all your changes for this branch.
- Right-click on your project, Fedora Packager > Create New Bodhi Update.
When creating a Bodhi update using Fedora Packager for Eclipse, similar information is required as needed by the Bodhi web interface. Once an update has successfully been created, the pushed update will be visible in the Bodhi updates website. The status of updates can also be tracked there.
Configure SSH in Eclipse
Before you get started with importing packages from Fedora Git, you should have your FAS SSH keys set up in Eclipse. You should do this because if Fedora Packager for Eclipse finds a ~/.fedora.cert file, it will use an SSH based clone URL with your FAS username extracted from this certificate. Note that you'll have the option of cloning anonymously anyway.
Unfortunately, Eclipse can't use your ssh-agent. Our believe is that this is because Eclipse has to run on several platforms (not just Eclipse). Since UNIX sockets are platform dependent, this may be be reason why Eclipse can't use it.
Eclipse SSH Preferences
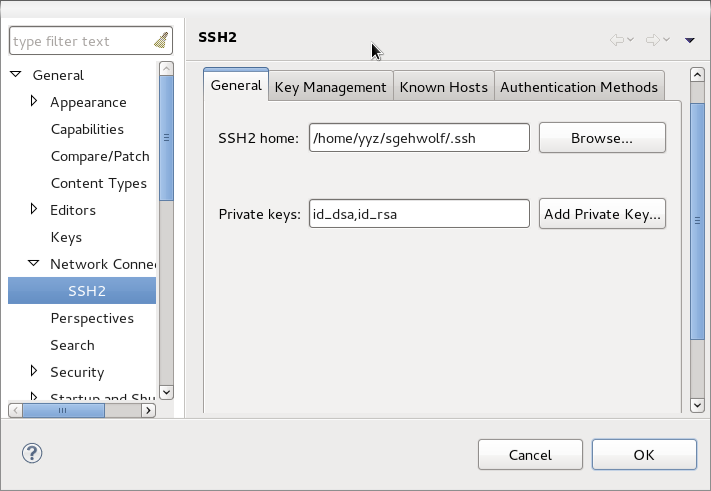
Press CTRL+3, type "SSH2" and hit return. This should bring you to the following page:
Make sure that your FAS SSH key is listed there and you can successfully unlock your key.
Feedback/Reporting Bugs
- If a bug is found in the Fedora Packager for Eclipse, please feel free to open a ticket at Fedora Hosted (an FAS username is required to create tickets).
- Alternatively, try this query in Red Hat bugzilla in order to find already existing bugs. Thanks!

