mNo edit summary |
No edit summary |
||
| Line 1: | Line 1: | ||
{{autolang|base=yes}} | |||
In this how-to, we will illustrate three ways to edit iptables Rules : | In this how-to, we will illustrate three ways to edit iptables Rules : | ||
Revision as of 14:07, 22 February 2014
在这篇文档里里我们将主要举例介绍三种编辑 iptables 规则的方式:
- CLI: iptables 命令行接口和系统配置文件 /etc/sysconfig/iptables.
- TUI 基于文本的接口: setup 或 system-config-firewall-tui
- GUI: system-config-firewall
需要注意的是本篇文章只是说明了如何编辑已有 iptables 规则,并不包含开始的创建规则链。
CLI(命令行接口)
对 iptables 的更改即时生效
下面的过程可以在防火墙运行的情况下改变防火墙策略。
阅读 man 手册中关于 iptables 的部分(man iptables)来获取深入的解释和高级复杂的规则实例。
列出现有规则
使用
iptables -L
命令可以查看当前正在使用的 iptables 规则。
允许已经建立及其相关的连接、icmp 请求、所有本地数据和 ssh 通讯的 iptables 规则例子:
[root@server ~]# iptables -L
Chain INPUT (policy DROP)
target     prot opt source               destination
ACCEPT     all  --  anywhere             anywhere             state RELATED,ESTABLISHED
ACCEPT     icmp --  anywhere             anywhere
ACCEPT     all  --  anywhere             anywhere
ACCEPT     tcp  --  anywhere             anywhere             state NEW tcp dpt:ssh

Chain FORWARD (policy ACCEPT)
target     prot opt source               destination

Chain OUTPUT (policy ACCEPT)
target     prot opt source               destination
注意规则是按顺序匹配的,只要有匹配的规则便不会再往下接着检查。因此,举个例子来说,如果一条规则拒绝 ssh 连接,其后又有一条规则允许 ssh,那么就会应用拒绝 ssh 的规则,后面允许 ssh 连接的规则就不会应用,也就无法起到作用。
追加规则
下面在指定的链的最后面添加一条规则:
[root@server ~]# iptables -A INPUT -p tcp --dport 80 -j ACCEPT
[root@server ~]# iptables -L
Chain INPUT (policy DROP)
target     prot opt source               destination
ACCEPT     all  --  anywhere             anywhere             state RELATED,ESTABLISHED
ACCEPT     icmp --  anywhere             anywhere
ACCEPT     all  --  anywhere             anywhere
ACCEPT     tcp  --  anywhere             anywhere             state NEW tcp dpt:ssh
ACCEPT     tcp  --  anywhere             anywhere             tcp dpt:http

Chain FORWARD (policy ACCEPT)
target     prot opt source               destination

Chain OUTPUT (policy ACCEPT)
target     prot opt source               destination
注意 INPUT 链的最后一行。现在该链中已经有 5 条规则了。
删除规则
要删除一条规则就必须要知道该规则在链中的位置。下面的例子删除之前添加的那一条规则(在 INPUT 链的第5条):
[root@server ~]# iptables -D INPUT 5
[root@server ~]# iptables -L
Chain INPUT (policy DROP)
target     prot opt source               destination
ACCEPT     all  --  anywhere             anywhere             state RELATED,ESTABLISHED
ACCEPT     icmp --  anywhere             anywhere
ACCEPT     all  --  anywhere             anywhere
ACCEPT     tcp  --  anywhere             anywhere             state NEW tcp dpt:ssh

Chain FORWARD (policy ACCEPT)
target     prot opt source               destination

Chain OUTPUT (policy ACCEPT)
target     prot opt source               destination
插入规则
在顶部(第一条)新建一条规则:
[root@server ~]# iptables -I INPUT 1 -p tcp --dport 80 -j ACCEPT
[root@server ~]# iptables -L
Chain INPUT (policy DROP)
target     prot opt source               destination
ACCEPT     tcp  --  anywhere             anywhere             tcp dpt:http
ACCEPT     all  --  anywhere             anywhere             state RELATED,ESTABLISHED
ACCEPT     icmp --  anywhere             anywhere
ACCEPT     all  --  anywhere             anywhere
ACCEPT     tcp  --  anywhere             anywhere             state NEW tcp dpt:ssh

Chain FORWARD (policy ACCEPT)
target     prot opt source               destination

Chain OUTPUT (policy ACCEPT)
target     prot opt source               destination
链后面的数值就是新规则所要插入的位置,即新规则将要在的位置。比如说插入一条规则为第三条,则指定3,之前的第三条及其后面的规则都会被依次下移。
替换规则
也可以指定规则替换链中存在的规则。
在之前的例子中,第一条规则允许任意地址到 http 端口(80)的连接。下面替换该规则,限制只允许地址在 192.168.0.0/24 范围内且到标准 http 端口(80)的连接:
[root@server ~]# iptables -R INPUT 1 -p tcp -s 192.168.0.0/24 --dport 80 -j ACCEPT
[root@server ~]# iptables -L
Chain INPUT (policy DROP)
target     prot opt source               destination
ACCEPT     tcp  --  192.168.0.0/24       anywhere             tcp dpt:http
ACCEPT     all  --  anywhere             anywhere             state RELATED,ESTABLISHED
ACCEPT     icmp --  anywhere             anywhere
ACCEPT     all  --  anywhere             anywhere
ACCEPT     tcp  --  anywhere             anywhere             state NEW tcp dpt:ssh

Chain FORWARD (policy ACCEPT)
target     prot opt source               destination

Chain OUTPUT (policy ACCEPT)
target     prot opt source               destination
清空规则
使用--flush,-F选项清空 iptables 规则:
iptables -F <chain>
Specifying a <chain> is optional; without a chain specification, all chains are flushed.
Example to flush Rules in the OUTPUT chain :
[root@server ~]# iptables -F OUTPUT
使规则永久生效
用 CLI 命令改变的规则在系统重启后就会丢失。不过 iptables 提供了两个有哦那个的工具: iptables-save and iptables-restore.
- iptables-save 打印当前 iptables 规则到 stdout。 当然也可以重定向到指定文件:
[root@server ~]# iptables-save > iptables.dump
[root@server ~]# cat iptables.dump
# Generated by iptables-save v1.4.12 on Wed Dec  7 20:10:49 2011
*filter
:INPUT DROP [45:2307]
:FORWARD ACCEPT [0:0]
:OUTPUT ACCEPT [1571:4260654]
-A INPUT -m state --state RELATED,ESTABLISHED -j ACCEPT
-A INPUT -p icmp -j ACCEPT
-A INPUT -i lo -j ACCEPT
-A INPUT -p tcp -m state --state NEW -m tcp --dport 22 -j ACCEPT
COMMIT
# Completed on Wed Dec  7 20:10:49 2011
- iptables-restore : 恢复 iptables-save 转存的规则。
[root@server ~]# iptables-restore < iptables.dump
[root@server ~]# iptables -L
Chain INPUT (policy DROP)
target     prot opt source               destination
ACCEPT     all  --  anywhere             anywhere             state RELATED,ESTABLISHED
ACCEPT     icmp --  anywhere             anywhere
ACCEPT     all  --  anywhere             anywhere
ACCEPT     tcp  --  anywhere             anywhere             state NEW tcp dpt:ssh

Chain FORWARD (policy ACCEPT)
target     prot opt source               destination

Chain OUTPUT (policy ACCEPT)
target     prot opt source               destination
在停止服务的时候保存当前的规则到文件,然后再启动服务的时候用于恢复:
/etc/sysconfig/iptables
对应 IPv4/etc/sysconfig/ip6tables
对应 IPv6
如果喜欢可以直接编辑这些文件,然后重启服务就可以应用更改。格式和 iptables CLI 命令相似 If preferred, these files may be editted directly, and iptables service restarted to commit the changes. The format is similar to that of the iptables CLI commands:
# Generated by iptables-save v1.4.12 on Wed Dec  7 20:22:39 2011
*filter <--------------------------------------------------------- 指出下一条规则的所属表
:INPUT DROP [157:36334] <----------------------------------------- 这是 filter 表的三个链,接着是链默认策略
:FORWARD ACCEPT [0:0] <------------------------------------------- 中括号[<packet-counter>:<byte-counter>]间的数值只是用于
:OUTPUT ACCEPT [48876:76493439] <--------------------------------- 调试或者显示信息。不要修改它们。
-A INPUT -m state --state RELATED,ESTABLISHED -j ACCEPT <--------- 一条规则。
-A INPUT -p icmp -j ACCEPT <-------------------------------------- 只要列出需要的 iptables 命令
-A INPUT -i lo -j ACCEPT <---------------------------------------- 选项和参数。
-A INPUT -p tcp -m state --state NEW -m tcp --dport 22 -j ACCEPT
COMMIT <---------------------------------------------------------- 需要在每个表的后面,用于提交规则到该表
# Completed on Wed Dec  7 20:22:39 2011
如果需要,可以使用 -Z, --zero 选项重置包计数和大小计数:
iptables -Z <chain> <rule_number>
可以仅仅重置一条规则的计数。如果要知道一条特定规则捕获了多少包,这可能比较有用
TUI(基于文本的接口)
GUI
In this how-to, we will illustrate three ways to edit iptables Rules :
- CLI : iptables command line interface and system configuration file /etc/sysconfig/iptables.
- TUI (text-based) interface : setup or system-config-firewall-tui
- GUI : system-config-firewall
NOTE: This how-to illustrates editing existing iptables Rules, not the initial creation of Rules chains.
CLI (command line interface)
Hot changes to iptables Rules
The following procedures allow changes in the behaviour of the firewall while it is running.
Read the man pages for iptables (man iptables) for further explanations and more sophisticated Rules examples.
Listing Rules
Current running iptables Rules can be viewed with the command
iptables -L
.
Example of iptables Rules allowing any connections already established or related, icmp requests, all local traffic, and ssh communication:
[root@server ~]# iptables -L
Chain INPUT (policy DROP)
target     prot opt source               destination
ACCEPT     all  --  anywhere             anywhere             state RELATED,ESTABLISHED
ACCEPT     icmp --  anywhere             anywhere
ACCEPT     all  --  anywhere             anywhere
ACCEPT     tcp  --  anywhere             anywhere             state NEW tcp dpt:ssh

Chain FORWARD (policy ACCEPT)
target     prot opt source               destination

Chain OUTPUT (policy ACCEPT)
target     prot opt source               destination
Note that Rules are applied in order of appearance, and the inspection ends immediately when there is a match. Therefore, for example, if a Rule rejecting ssh connections is created, and afterward another Rule is specified allowing ssh, the Rule to reject is applied and the later Rule to accept the ssh connection is not.
Appending Rules
The following adds a Rule at the end of the specified chain of iptables:
[root@server ~]# iptables -A INPUT -p tcp --dport 80 -j ACCEPT
[root@server ~]# iptables -L
Chain INPUT (policy DROP)
target     prot opt source               destination
ACCEPT     all  --  anywhere             anywhere             state RELATED,ESTABLISHED
ACCEPT     icmp --  anywhere             anywhere
ACCEPT     all  --  anywhere             anywhere
ACCEPT     tcp  --  anywhere             anywhere             state NEW tcp dpt:ssh
ACCEPT     tcp  --  anywhere             anywhere             tcp dpt:http

Chain FORWARD (policy ACCEPT)
target     prot opt source               destination

Chain OUTPUT (policy ACCEPT)
target     prot opt source               destination
Notice the last line in chain INPUT. There are now five Rules in that chain.
Deleting Rules
To delete a Rule, you must know its position in the chain. The following example deletes an existing Rule created earlier that is currently in the fifth position:
[root@server ~]# iptables -D INPUT 5
[root@server ~]# iptables -L
Chain INPUT (policy DROP)
target     prot opt source               destination
ACCEPT     all  --  anywhere             anywhere             state RELATED,ESTABLISHED
ACCEPT     icmp --  anywhere             anywhere
ACCEPT     all  --  anywhere             anywhere
ACCEPT     tcp  --  anywhere             anywhere             state NEW tcp dpt:ssh

Chain FORWARD (policy ACCEPT)
target     prot opt source               destination

Chain OUTPUT (policy ACCEPT)
target     prot opt source               destination
Inserting Rules
Create a Rule at the top (first) position:
[root@server ~]# iptables -I INPUT 1 -p tcp --dport 80 -j ACCEPT
[root@server ~]# iptables -L
Chain INPUT (policy DROP)
target     prot opt source               destination
ACCEPT     tcp  --  anywhere             anywhere             tcp dpt:http
ACCEPT     all  --  anywhere             anywhere             state RELATED,ESTABLISHED
ACCEPT     icmp --  anywhere             anywhere
ACCEPT     all  --  anywhere             anywhere
ACCEPT     tcp  --  anywhere             anywhere             state NEW tcp dpt:ssh

Chain FORWARD (policy ACCEPT)
target     prot opt source               destination

Chain OUTPUT (policy ACCEPT)
target     prot opt source               destination
The number given after the chain name indicates the position before an existing Rule. So, for example, if you want to insert a Rule before the third rule you specify the number 3. Afterward, the existing Rule will then be in the fourth position in the chain.
Replacing Rules
Rules may be specified to replace existing Rules in the chain.
In the example shown previously, the first Rule given allows connections to the http port (port 80) from anywhere. The following replaces this Rule, restricting connections to the standard http port (port 80) only from the network address range 192.168.0.0/24:
[root@server ~]# iptables -R INPUT 1 -p tcp -s 192.168.0.0/24 --dport 80 -j ACCEPT
[root@server ~]# iptables -L
Chain INPUT (policy DROP)
target     prot opt source               destination
ACCEPT     tcp  --  192.168.0.0/24       anywhere             tcp dpt:http
ACCEPT     all  --  anywhere             anywhere             state RELATED,ESTABLISHED
ACCEPT     icmp --  anywhere             anywhere
ACCEPT     all  --  anywhere             anywhere
ACCEPT     tcp  --  anywhere             anywhere             state NEW tcp dpt:ssh

Chain FORWARD (policy ACCEPT)
target     prot opt source               destination

Chain OUTPUT (policy ACCEPT)
target     prot opt source               destination
Flushing Rules
To flush or clear iptables Rules, use the --flush, -F option :
iptables -F <chain>
Specifying a <chain> is optional; without a chain specification, all chains are flushed.
Example to flush Rules in the OUTPUT chain :
[root@server ~]# iptables -F OUTPUT
Making changes persistent
The iptables Rules changes using CLI commands will be lost upon system reboot. However, iptables comes with two useful utilities: iptables-save and iptables-restore.
- iptables-save prints a dump of current iptables rules to stdout. These may be redirected to a file:
[root@server ~]# iptables-save > iptables.dump
[root@server ~]# cat iptables.dump
# Generated by iptables-save v1.4.12 on Wed Dec  7 20:10:49 2011
*filter
:INPUT DROP [45:2307]
:FORWARD ACCEPT [0:0]
:OUTPUT ACCEPT [1571:4260654]
-A INPUT -m state --state RELATED,ESTABLISHED -j ACCEPT
-A INPUT -p icmp -j ACCEPT
-A INPUT -i lo -j ACCEPT
-A INPUT -p tcp -m state --state NEW -m tcp --dport 22 -j ACCEPT
COMMIT
# Completed on Wed Dec  7 20:10:49 2011
- iptables-restore : restore a dump of rules made by iptables-save.
[root@server ~]# iptables-restore < iptables.dump
[root@server ~]# iptables -L
Chain INPUT (policy DROP)
target     prot opt source               destination
ACCEPT     all  --  anywhere             anywhere             state RELATED,ESTABLISHED
ACCEPT     icmp --  anywhere             anywhere
ACCEPT     all  --  anywhere             anywhere
ACCEPT     tcp  --  anywhere             anywhere             state NEW tcp dpt:ssh

Chain FORWARD (policy ACCEPT)
target     prot opt source               destination

Chain OUTPUT (policy ACCEPT)
target     prot opt source               destination
Upon stopping the service, the current iptables Rules are saved in a file, and upon starting the service, this file is restored. The affected files are:
/etc/sysconfig/iptables
for IPv4/etc/sysconfig/ip6tables
for IPv6
If preferred, these files may be editted directly, and iptables service restarted to commit the changes. The format is similar to that of the iptables CLI commands:
# Generated by iptables-save v1.4.12 on Wed Dec  7 20:22:39 2011
*filter <--------------------------------------------------------- Specify the table of the next rules
:INPUT DROP [157:36334] <----------------------------------------- This is the three chain belong to filter table, then the policy of the chain
:FORWARD ACCEPT [0:0] <------------------------------------------- and between brackets [<packet-counter>:<byte-counter>] numbers is for
:OUTPUT ACCEPT [48876:76493439] <--------------------------------- debug/informations purpose only. Leave them at their current value.
-A INPUT -m state --state RELATED,ESTABLISHED -j ACCEPT <--------- A rule.
-A INPUT -p icmp -j ACCEPT <-------------------------------------- You just have to take all arguments
-A INPUT -i lo -j ACCEPT <---------------------------------------- of an iptables command.
-A INPUT -p tcp -m state --state NEW -m tcp --dport 22 -j ACCEPT
COMMIT <---------------------------------------------------------- Needed at each end of table definition. Commit rules in that table.
# Completed on Wed Dec  7 20:22:39 2011
If needed, to reset packet and byte counters, use -Z, --zero :
iptables -Z <chain> <rule_number>
It is possible to reset only reset a single rule counter. It can be useful, if you want to know how many packets were captured for a specific rule.
TUI (text-base user interface)
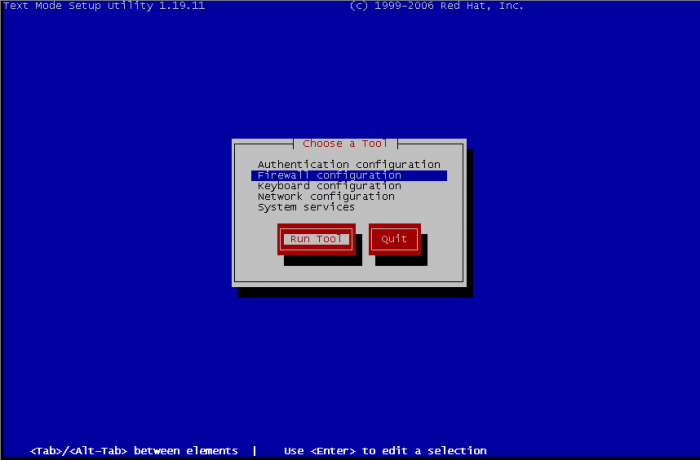
There is two ways for managing iptables rules with textual interface, by setup and system-config-firewall-tui. In the first choice you need to select firewall configuration and then edit rules, the second will bring directly to the edition of rules. So, with setup, select Firewall configuration :
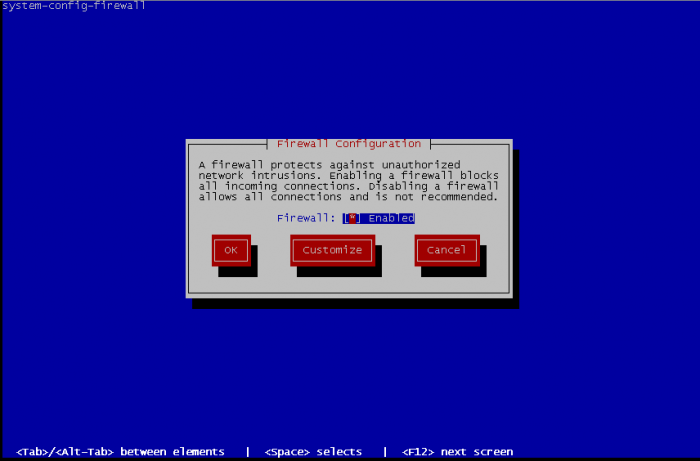
On the next screen, leave Firewall enabled or activate it if it wasn't enabled. Then we go on Customize :
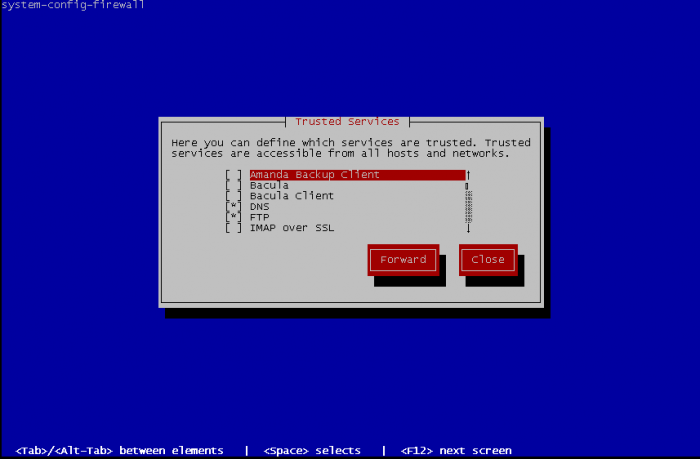
There is high chance that your service is part of the list of trusted services. This is basic activation of some standards services. Select what is needed and go Forward :
Now Edit other allowed ports :
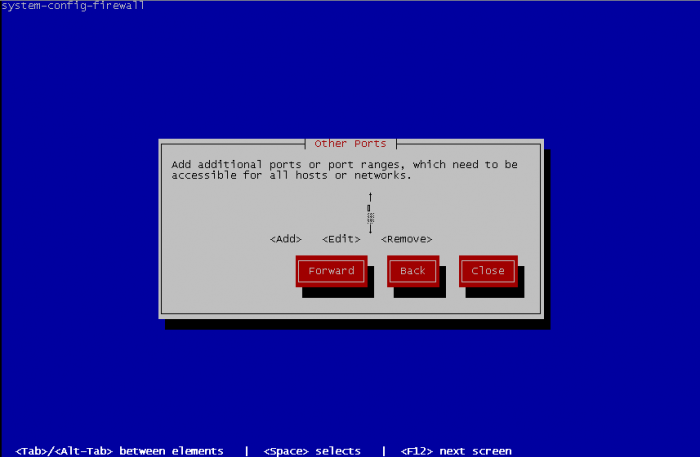
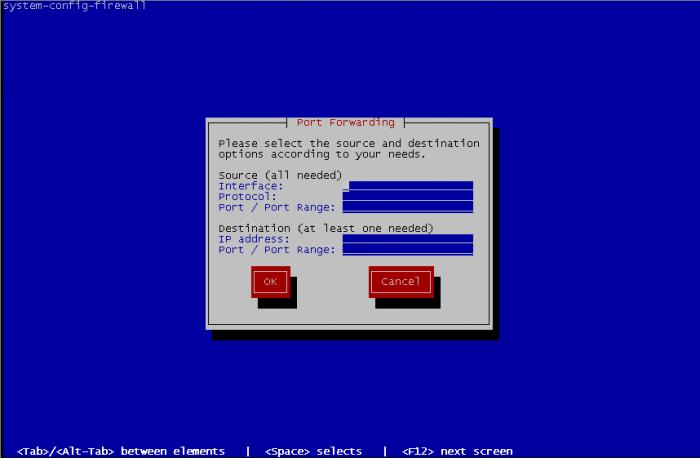
To add other ports, specify one port or a port range, and choose between tcp or udp for protocol. Port range format is beginningPort-endingPort.
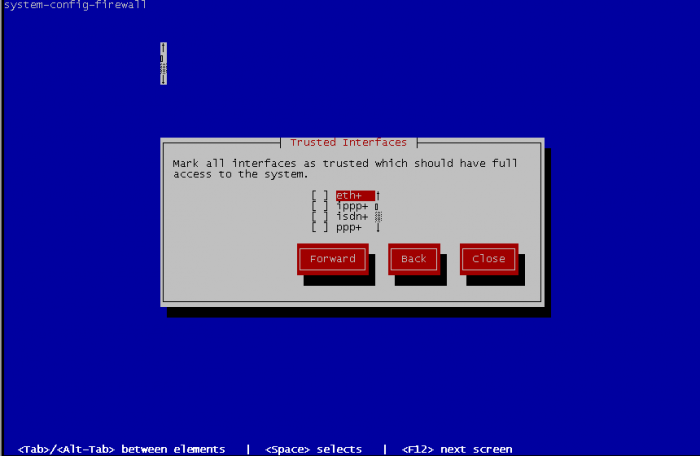
Select the trusted interfaces. These interfaces will become open face of network, all traffic will be allowed and the precedents rules will never match. So select an interface that face of a private network and never an interface that have to directly deal with internet.
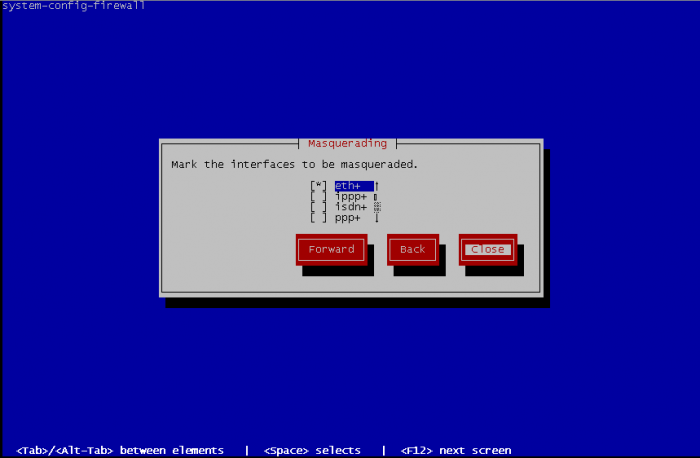
Select interfaces to be masqueraded. Masquerading is better known as NAT (Network Address Translation), it is useful by example when your Fedora computer is used as gateway to access the internet :
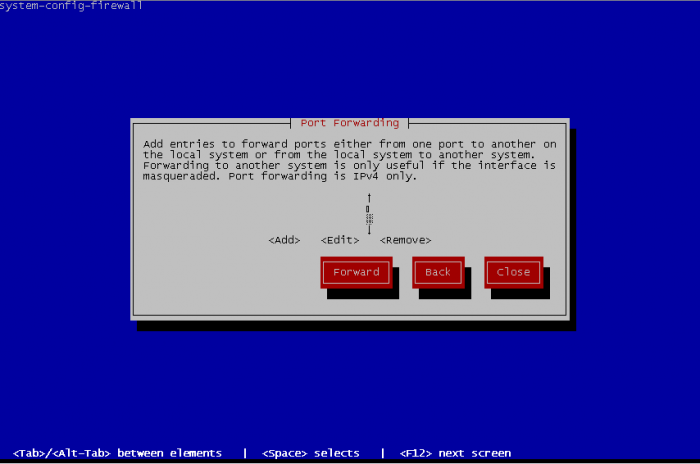
Port forwarding is also known as PAT permit to reroute traffic from a port to another port
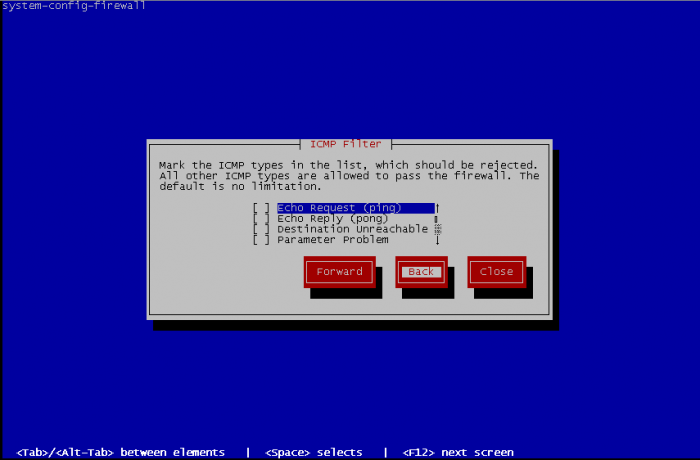
You can define ICMP behaviour of your fedora. By default, no limitations are made but you can define rules to reject ICMP traffic, define the return error to an ICMP request, etc.
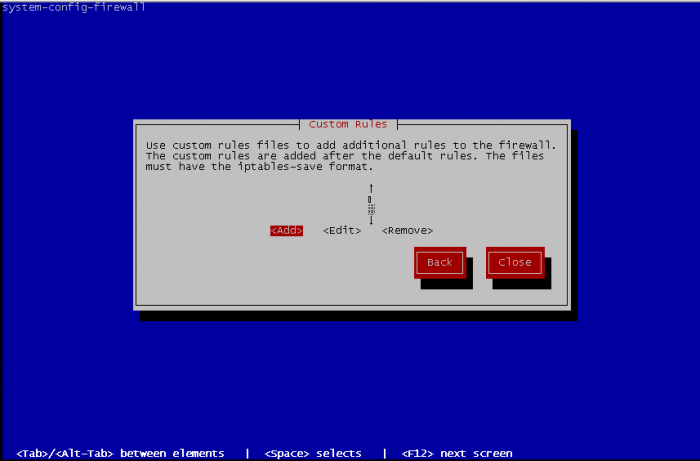
Finally, you can define some custom rules. But it is needed to edit a file containing your custom rules before, with same format than the iptables file, but without specifying the table of iptables used.
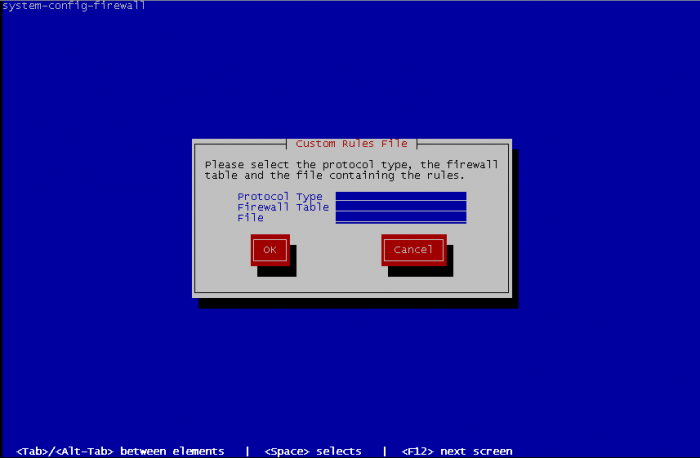
For adding custom rules you have specify the protocol between ipv4 or ipv6 and on what table add the custom rules filter, mangle or nat then the path to the file containing rules to add :
When it's done, Close the interface and this bring you at first screen of firewall configuration. Select OK and a warning message appear :
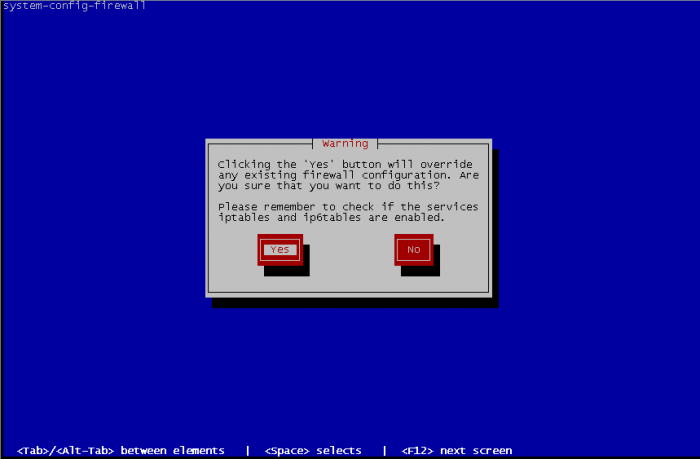
Select Yes if the configuration you made fits to you and exit interface, or No for came back to the firewall configuration screen.
GUI
Red Hat GUI configuration tool
GUI interface allow you exactly the same thing that TUI interface, but it is more friendly usable.
First time you start GUI, you have a welcome message that warning you that if you have existing manual rules then this rules will be overwritten.
Before all, you need to Enable your firewall to use Firewall Configuration utility.
Then utility warn you that you don't have any existing configuration and want you execute the wizard. Click on Start wizard:
Click on forward :
System with network access enable Firewall and System without network access disable Firewall, so select System with network access :
Beginner allow you to modify only Trusted Services, it's fine if you use only known services like ftp, dns, http, etc but don't allow you to configure customs ports range, select Expert to have full featured Firewall Configuration utility, you can change this option later in the Options menu Main windows, in User Skill Level :
Server template enable only ssh port on firewall configuration Desktop template enable additional ports for IPsec, Multicast DNS, Network Printing Client and SSH. For convenience select Desktop, and OK :
As described earlier Desktop template enable 4 services IPsec, mDNS, IPP and SSH. If you have services listed in Trusted Services section that you want to enabled, you just have to click on it, that's all. It is possible to change template by using the Options menu, in Load Default Configuration.
Other Ports allow you to edit custom rules if your service port wasn't in Trusted service. To begin, just click on Add button. Then either you choose in services list the right service or you tick User Defined and fill requested information about Port / Port Range and Protocol.
'Trusted Interfaces, Masquerading, Port Forwarding, ICMP Filter and Custom Rules have exactly the same effect than in TUI interface.
When configuration fits to you, just click on the Apply button.
Others GUI
There are others GUI available to configure iptables rules.
- [fwbuilder] : very complete gui tools to configure iptables.
- [Shorewall] : another very complete gui like fwbuilder.
- [Turtle firewall project] : web interface and integrated to webmin. Fits to basic usage of Iptables, can not handle all iptables options like fwbuilder
- [IPmenu] : console based interface that allow you all iptables functionalities.
