(initial version) |
m (Karsten moved page User:Karsten/chrony-k8s to User:Karsten/chrony-kubernates) |
(No difference)
| |
Revision as of 15:53, 9 January 2017
Installing kubernates (k8s)
To test something in kubernates, a smaller version called minicube is available. For some unknown reason it doesn't seem to work with kvm, you need to install VirtualBox instead. Make sure to install kernel-devel before you attempt to install VirtualBox, otherwise a required virtualbox kernel module can't be compiled. You will also need kubectl which you can find in the origin-clients package.
So the required steps to prepare for kubernetes startup are:
dnf install kernel-devel origin-clients
> dnf install http://download.virtualbox.org/virtualbox/5.1.10/VirtualBox-5.1-5.1.10_112026_fedora25-1.x86_64.rpm
> curl -Lo minikube https://storage.googleapis.com/minikube/releases/v0.14.0/minikube-linux-amd64
> chmod +x minikube
> mv minikube /usr/local/bin/
For the first start of minikube you need to specify which vm-driver it should use:
minikube start --vm-driver virtualbox
> minikube status

minikubeVM: Running
localkube: Running

> kubectl get cs
NAME                 STATUS    MESSAGE              ERROR
controller-manager   Healthy   ok
scheduler            Healthy   ok
etcd-0               Healthy   {"health": "true"}
Now you need to copy minikube ssl certificates to the docker directory:
> cp ~/.minikube/certs/cert.pem /etc/docker/cert.pem
> cp ~/.minikube/certs/ca.pem /etc/docker/
> cp ~/.minikube/certs/key.pem /etc/docker/key.pem
> chmod a+r  /etc/docker/key.pem
To get the login token for docker.io, point your webbrowser at [1] and log in with your username and password. Then connect to the minikube dashboard which runs on port 30000 on the minikube ip. You can get that ip with the command
minikube ip
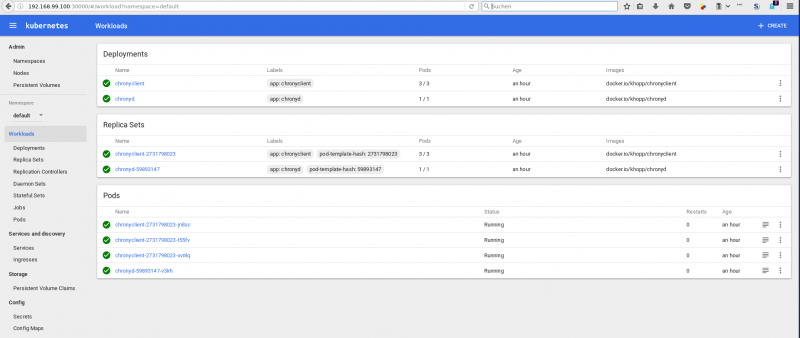
Put together, the URL for the minikube dashboard should look similar to this one: http://192.168.99.100:30000 and you should see something like this:
Adding a chrony server to the cluster
Now a chrony container needs to deployed. Open the deployments tab and click on Create at the top of the page. Enter an app name and the URL to the image with that app. I've used chronyd as the name and my chrony images is available on github.io as docker.io/khopp/chronyd. Select Show Advanced Options and check the Run as privileged button. It should also be possible to use docker run parameters --cap-add SYS_TIME instead, but I've found no way to specify that in minikube (yet). Now click on Deploy at the bottom of the dashboard and after a couple of seconds your chrony server should be up&running in kubernetes.
Adding chrony clients to the cluster
Make sure that your container images contain chrony, that it gets started at container startup and you also need to add
server chronyd
to the /etc/chrony.conf inside that container. All other server directives should be commented out. chronyd in this case is the k8s service name which gets derived from the app name of your chrony server app (the previous step). If you set a different name there, make sure to change it similarily in /etc/chrony.conf.
Test if the setup works as expected
After deploying the image with the chrony client you can test it like this:
> kubectl get pods
NAME                            READY     STATUS    RESTARTS   AGE
chronyclient-2731798023-jn8sc   1/1       Running   0          3h
chronyclient-2731798023-t55fv   1/1       Running   0          3h
chronyclient-2731798023-xvr8q   1/1       Running   0          3h
chronyd-59893147-v3lrh          1/1       Running   0          3h
Select one of the chrony client pods, for example chronyclient-2731798023-jn8sc. You need to enable settime capabilities in that container, run
> kubectl exec chronyclient-2731798023-jn8sc chronyc manual on
200 OK
Check that the chrony server container is the only source for NTP:
> kubectl exec chronyclient-2731798023-jn8sc chronyc sources
210 Number of sources = 1
MS Name/IP address         Stratum Poll Reach LastRx Last sample
===============================================================================
^? chronyd.default.svc.clust     0  10     0     -     +0ns[   +0ns] +/-    0ns
Now change the time in the client container to see if it gets changed back by chrony:
> kubectl exec chronyclient-2731798023-jn8sc chronyc settime 16:30
200 OK
Clock was -2179.23 seconds fast.  Frequency change = 0.00ppm, new frequency = 0.00ppm

> kubectl exec chronyclient-2731798023-jn8sc date
Mon Jan  9 16:30:00 UTC 2017
> kubectl exec chronyclient-2731798023-jn8sc date
Mon Jan  9 15:50:53 UTC 2017
It works !

