In this how to, we will learn three differents way to edit IPtables rules :
- CLI : iptables command and his config file /etc/sysconfig/iptables.
- TUI/textual interface : setup or system-config-firewall-tui
- GUI : system-config-firewall
It is not an how to about making elaborates rules with iptables, we only use iptables on a basic way.
CLI
Hot changes in iptables rules content
The following procedures allow you to change the behaviour of your iptables firewall while it is running.
Read the man pages for iptables (man iptables) for further explanations and more sophisticated Rules examples.
List rules
Current running iptables Rules can be viewed with the command
iptables -L
.
Example of iptables Rules allowing any connections already established or related, icmp requests, all local traffic, and ssh communication:
[root@server ~]# iptables -L
Chain INPUT (policy DROP)
target     prot opt source               destination
ACCEPT     all  --  anywhere             anywhere             state RELATED,ESTABLISHED
ACCEPT     icmp --  anywhere             anywhere
ACCEPT     all  --  anywhere             anywhere
ACCEPT     tcp  --  anywhere             anywhere             state NEW tcp dpt:ssh

Chain FORWARD (policy ACCEPT)
target     prot opt source               destination

Chain OUTPUT (policy ACCEPT)
target     prot opt source               destination
Note that Rules are applied in order of appearance, and the inspection ends immediately when there is a match. Therefore, for example, if a Rule rejecting ssh connections is created, and afterward another Rule is specified allowing ssh, the Rule to reject is applied and the later Rule to accept the ssh connection is not.
Append a rule
The following adds a Rule at the end of the specified chain of iptables:
[root@server ~]# iptables -A INPUT -p tcp --dport 80 -j ACCEPT
[root@server ~]# iptables -L
Chain INPUT (policy DROP)
target     prot opt source               destination
ACCEPT     all  --  anywhere             anywhere             state RELATED,ESTABLISHED
ACCEPT     icmp --  anywhere             anywhere
ACCEPT     all  --  anywhere             anywhere
ACCEPT     tcp  --  anywhere             anywhere             state NEW tcp dpt:ssh
ACCEPT     tcp  --  anywhere             anywhere             tcp dpt:http

Chain FORWARD (policy ACCEPT)
target     prot opt source               destination

Chain OUTPUT (policy ACCEPT)
target     prot opt source               destination
Notice the last line in chain INPUT. There are now 5 Rules in that chain.
Delete rules
To delete a Rule, you must known its position number. The following example affects an existing Rule created earlier that is in fifth position:
[root@server ~]# iptables -D INPUT 5
[root@server ~]# iptables -L
Chain INPUT (policy DROP)
target     prot opt source               destination
ACCEPT     all  --  anywhere             anywhere             state RELATED,ESTABLISHED
ACCEPT     icmp --  anywhere             anywhere
ACCEPT     all  --  anywhere             anywhere
ACCEPT     tcp  --  anywhere             anywhere             state NEW tcp dpt:ssh

Chain FORWARD (policy ACCEPT)
target     prot opt source               destination

Chain OUTPUT (policy ACCEPT)
target     prot opt source               destination
Insert rules
Create a Rule at the top (first) position:
[root@server ~]# iptables -I INPUT 1 -p tcp --dport 80 -j ACCEPT
[root@server ~]# iptables -L
Chain INPUT (policy DROP)
target     prot opt source               destination
ACCEPT     tcp  --  anywhere             anywhere             tcp dpt:http
ACCEPT     all  --  anywhere             anywhere             state RELATED,ESTABLISHED
ACCEPT     icmp --  anywhere             anywhere
ACCEPT     all  --  anywhere             anywhere
ACCEPT     tcp  --  anywhere             anywhere             state NEW tcp dpt:ssh

Chain FORWARD (policy ACCEPT)
target     prot opt source               destination

Chain OUTPUT (policy ACCEPT)
target     prot opt source               destination
The number given after the chain name indicates the position before an existing Rule. So, for example, if you want to insert a Rule before the third rule you specify the number 3. Afterward, the existing Rule will then be in the fourth position in the chain.
Replace a Rule
Rules may be specified to replace existing Rules in the chain.
In the example shown previously, the first Rule given allows connections to the http port (port 80) from anywhere. The following replaces this Rule, restricting connections to the standard http port (port 80) only from the network address range 192.168.0.0/24:
[root@server ~]# iptables -R INPUT 1 -p tcp -s 192.168.0.0/24 --dport 80 -j ACCEPT
[root@server ~]# iptables -L
Chain INPUT (policy DROP)
target     prot opt source               destination
ACCEPT     tcp  --  192.168.0.0/24       anywhere             tcp dpt:http
ACCEPT     all  --  anywhere             anywhere             state RELATED,ESTABLISHED
ACCEPT     icmp --  anywhere             anywhere
ACCEPT     all  --  anywhere             anywhere
ACCEPT     tcp  --  anywhere             anywhere             state NEW tcp dpt:ssh

Chain FORWARD (policy ACCEPT)
target     prot opt source               destination

Chain OUTPUT (policy ACCEPT)
target     prot opt source               destination
Flush Rules
To clear all iptables Rules, use the --flush, -F option :
iptables -F <chain>
Specifying a <chain> is optional; without a chain specification, all chains are flushed.
Example to flush Rules in the OUTPUT chain :
[root@server ~]# iptables -F OUTPUT
Make changes persistant
When editing iptables rules with iptables command, if there is a reboot then changes in rules are lost.
Happily, iptables comes with two useful utilities : iptables-save and iptables-restore.
- iptables-save : print a reusable dump of current iptables rules. You have to redirect to a file like that :
[root@server ~]# iptables-save > iptables.dump
[root@server ~]# cat iptables.dump
# Generated by iptables-save v1.4.12 on Wed Dec  7 20:10:49 2011
*filter
:INPUT DROP [45:2307]
:FORWARD ACCEPT [0:0]
:OUTPUT ACCEPT [1571:4260654]
-A INPUT -m state --state RELATED,ESTABLISHED -j ACCEPT
-A INPUT -p icmp -j ACCEPT
-A INPUT -i lo -j ACCEPT
-A INPUT -p tcp -m state --state NEW -m tcp --dport 22 -j ACCEPT
COMMIT
# Completed on Wed Dec  7 20:10:49 2011
- iptables-restore : restore a dump of rules made by iptables-save.
[root@server ~]# iptables-restore < iptables.dump
[root@server ~]# iptables -L
Chain INPUT (policy DROP)
target     prot opt source               destination
ACCEPT     all  --  anywhere             anywhere             state RELATED,ESTABLISHED
ACCEPT     icmp --  anywhere             anywhere
ACCEPT     all  --  anywhere             anywhere
ACCEPT     tcp  --  anywhere             anywhere             state NEW tcp dpt:ssh

Chain FORWARD (policy ACCEPT)
target     prot opt source               destination

Chain OUTPUT (policy ACCEPT)
target     prot opt source               destination
At each stop of service, current state of iptables rules set is saved in a file and each start the service restores this file. The file is located in :
/etc/sysconfig/iptables
for IPv4/etc/sysconfig/ip6tables
for IPv6
So, if you prefer, you can edit this file and restart the iptables service to commit the changes. The format is pretty the same than iptables command :
# Generated by iptables-save v1.4.12 on Wed Dec  7 20:22:39 2011
*filter <--------------------------------------------------------- Specify the table of the next rules
:INPUT DROP [157:36334] <----------------------------------------- This is the three chain belong to filter table, then the policy of the chain
:FORWARD ACCEPT [0:0] <------------------------------------------- and between brackets [<packet-counter>:<byte-counter>] numbers is for
:OUTPUT ACCEPT [48876:76493439] <--------------------------------- debug/informations purpose only. Leave them at their current value.
-A INPUT -m state --state RELATED,ESTABLISHED -j ACCEPT <--------- A rule.
-A INPUT -p icmp -j ACCEPT <-------------------------------------- You just have to take all arguments
-A INPUT -i lo -j ACCEPT <---------------------------------------- of an iptables command.
-A INPUT -p tcp -m state --state NEW -m tcp --dport 22 -j ACCEPT
COMMIT <---------------------------------------------------------- Needed at each end of table definition. Commit rules in that table.
# Completed on Wed Dec  7 20:22:39 2011
If needed, to reset packet and byte counters, use -Z, --zero :
iptables -Z <chain> <rule_number>
It is possible to reset only reset a single rule counter. It can be useful, if you want to know how many packets were captured for a specific rule.
TUI/semi graphical
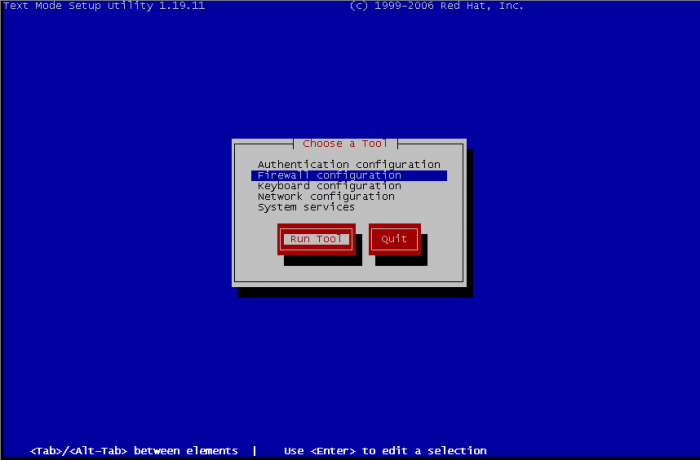
There is two ways for managing iptables rules with textual interface, by setup and system-config-firewall-tui. In the first choice you need to select firewall configuration and then edit rules, the second will bring directly to the edition of rules. So, with setup, select Firewall configuration :
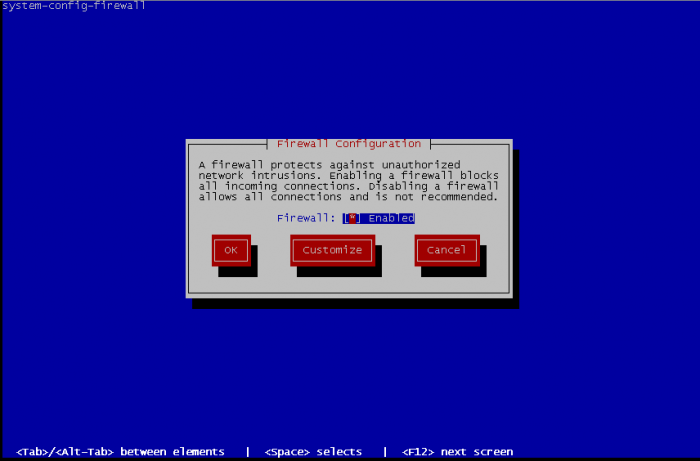
On the next screen, leave Firewall enabled or activate it if it wasn't enabled. Then we go on Customize :
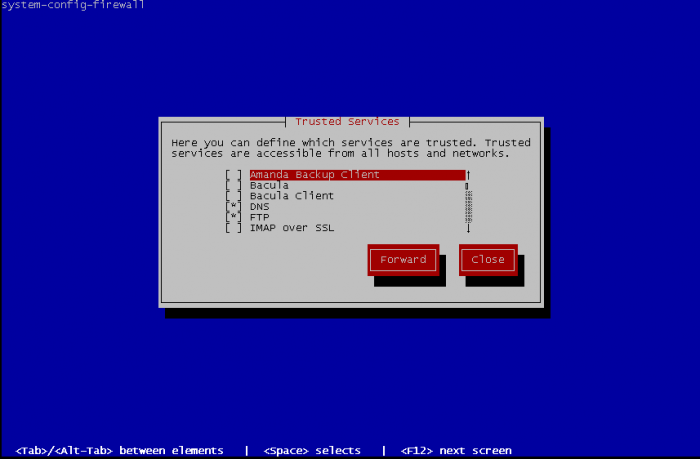
There is high chance that your service is part of the list of trusted services. This is basic activation of some standards services. Select what is needed and go Forward :
Now Edit other allowed ports :
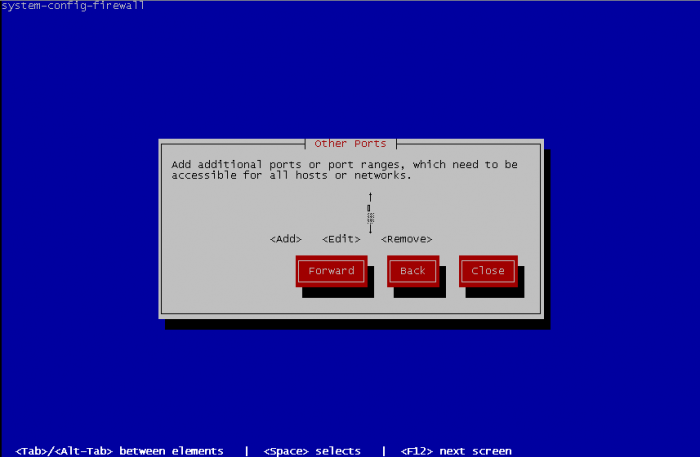
To add other ports, specify one port or a port range, and choose between tcp or udp for protocol. Port range format is beginningPort-endingPort.
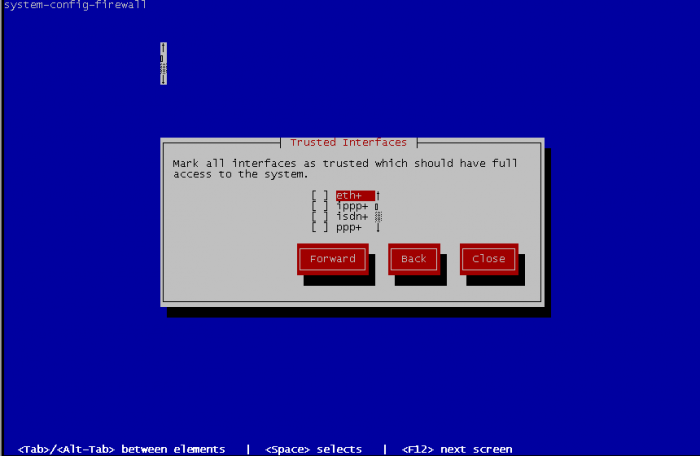
Select the trusted interfaces. These interfaces will become open face of network, all traffic will be allowed and the precedents rules will never match. So select an interface that face of a private network and never an interface that have to directly deal with internet.
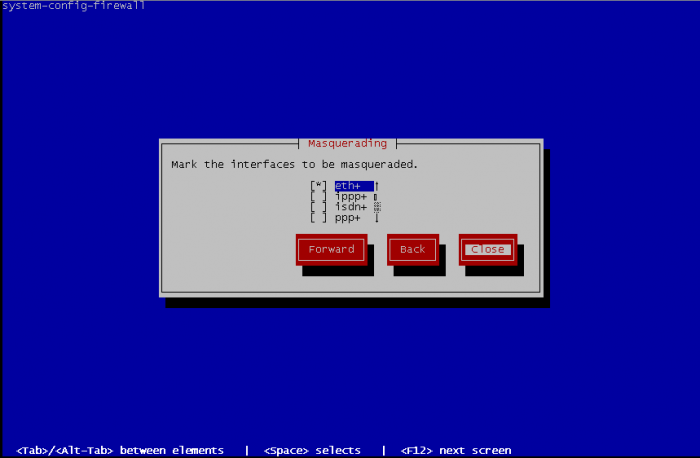
Select interfaces to be masqueraded. Masquerading is better known as NAT (Network Address Translation), it is useful by example when your Fedora computer is used as gateway to access the internet :
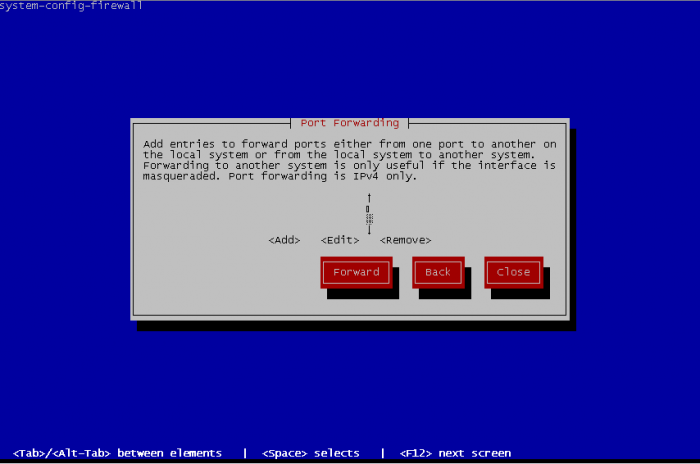
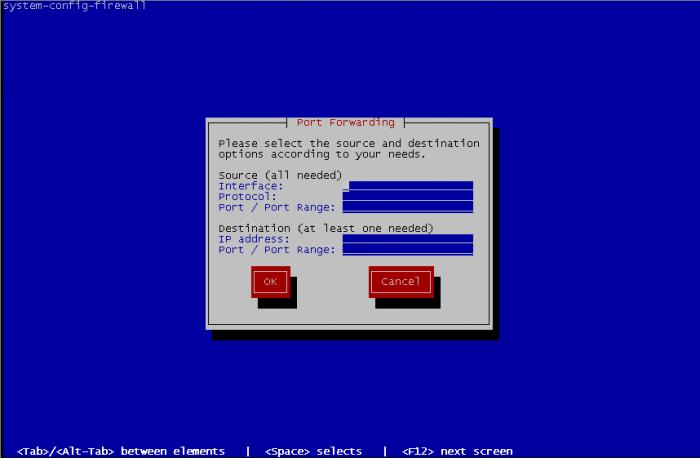
Port forwarding is also known as PAT permit to reroute traffic from a port to another port
You can define ICMP behaviour of your fedora. By default, no limitations are made but you can define rules to reject ICMP traffic, define the return error to an ICMP request, etc.
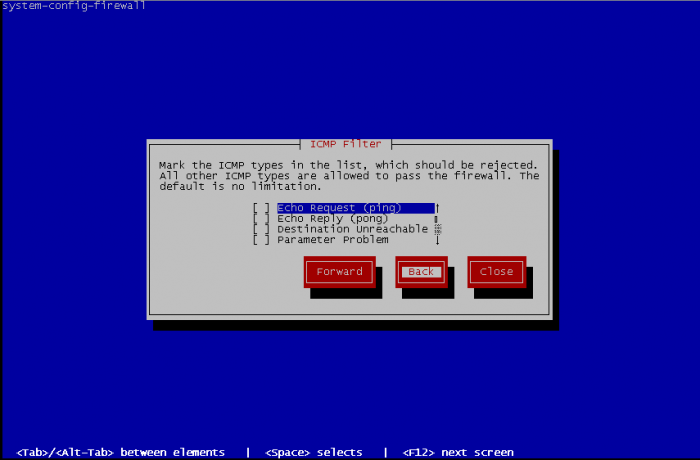
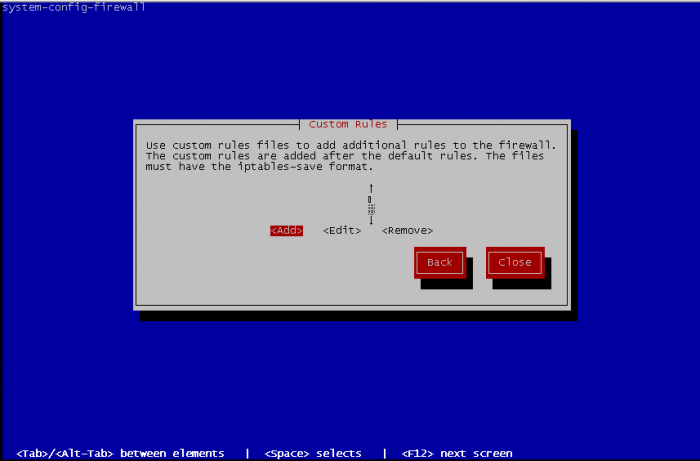
Finally, you can define some custom rules. But it is needed to edit a file containing your custom rules before, with same format than the iptables file, but without specifying the table of iptables used.
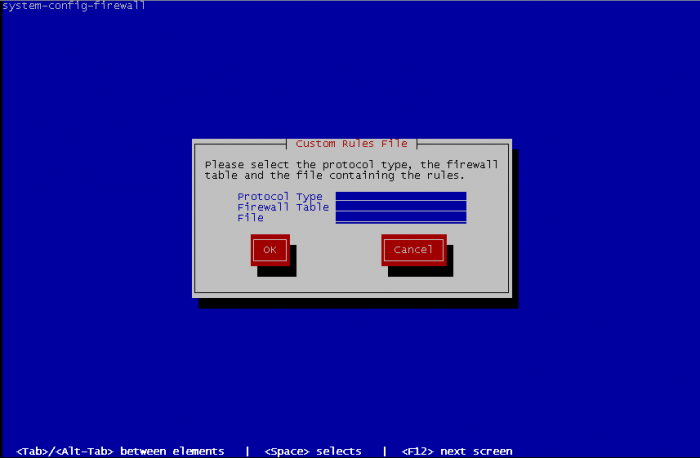
For adding custom rules you have specify the protocol between ipv4 or ipv6 and on what table add the custom rules filter, mangle or nat then the path to the file containing rules to add :
When it's done, Close the interface and this bring you at first screen of firewall configuration. Select OK and a warning message appear :
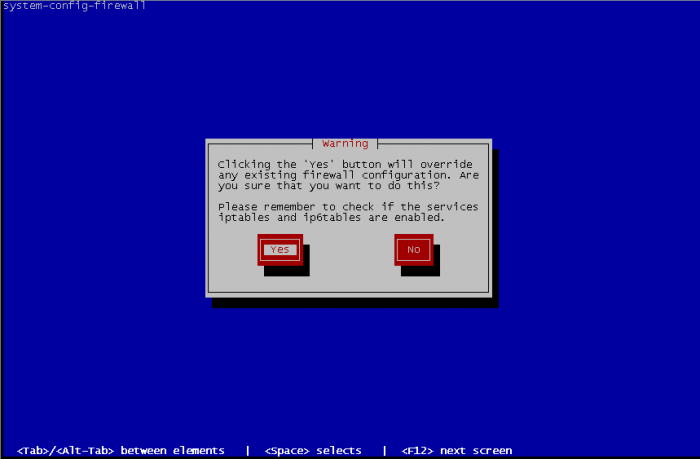
Select Yes if the configuration you made fits to you and exit interface, or No for came back to the firewall configuration screen.
GUI
Red Hat GUI configuration tool
GUI interface allow you exactly the same thing that TUI interface, but it is more friendly usable.
First time you start GUI, you have a welcome message that warning you that if you have existing manual rules then this rules will be overwritten.
Before all, you need to Enable your firewall to use Firewall Configuration utility.
Then utility warn you that you don't have any existing configuration and want you execute the wizard. Click on Start wizard:
Click on forward :
System with network access enable Firewall and System without network access disable Firewall, so select System with network access :
Beginner allow you to modify only Trusted Services, it's fine if you use only known services like ftp, dns, http, etc but don't allow you to configure customs ports range, select Expert to have full featured Firewall Configuration utility, you can change this option later in the Options menu Main windows, in User Skill Level :
Server template enable only ssh port on firewall configuration Desktop template enable additional ports for IPsec, Multicast DNS, Network Printing Client and SSH. For convenience select Desktop, and OK :
As described earlier Desktop template enable 4 services IPsec, mDNS, IPP and SSH. If you have services listed in Trusted Services section that you want to enabled, you just have to click on it, that's all. It is possible to change template by using the Options menu, in Load Default Configuration.
Other Ports allow you to edit custom rules if your service port wasn't in Trusted service. To begin, just click on Add button. Then either you choose in services list the right service or you tick User Defined and fill requested information about Port / Port Range and Protocol.
'Trusted Interfaces, Masquerading, Port Forwarding, ICMP Filter and Custom Rules have exactly the same effect than in TUI interface.
When configuration fits to you, just click on the Apply button.
Others GUI
There are others GUI available to configure iptables rules.
- [fwbuilder] : very complete gui tools to configure iptables.
- [Shorewall] : another very complete gui like fwbuilder.
- [Turtle firewall project] : web interface and integrated to webmin. Fits to basic usage of Iptables, can not handle all iptables options like fwbuilder
- [IPmenu] : console based interface that allow you all iptables functionalities.
