Applied Micro "Mustang" (X-C1) QuickStart Guide
This page contains some Quickstart instructions for getting up and running with an early engineering build of Fedora 19 on the Applied Micro "Mustang" development board. This Mustang build is based upon the Fedora 19 AArch64 bootstrap software builds, with the addition of a kernel and DeviceTree from the interim Applied Micro 1.10.09 engineering software release, packaged together into a single downloadable image for easy installation onto a hard disk or SSD. Applied Micro are currently working on upstreaming support into the mainline Linux kernel. In due course this image will be deprecated in favor of a standard Fedora build.
Pre-requisites for downloading and installing the Mustang Build
Prior to downloading and installing the Mustang build, you will require access to the following equipment:
- An existing Linux system, for example a laptop or desktop system
- A USB hard disk enclosure, or a spare disk bay in a Linux system
- A USB serial "null modem" cable (or USB serial adapter with "null modem" cable), or a serial port and a "null modem" cable
Hook up the Mustang board
Prior to installing Fedora, verify that the Mustang board is correctly hooked up and ready for use. To do this, perform the following:
- Attach a USB serial cable to your Linux system (or use a serial port), along with a "null modem" cable.
- Attach the other end of the serial cable to the DB9 connector on the rear of the Mustang system.
- Attach an Ethernet cable into the first Ethernet port on the Mustang system, which is located furthest away from the DB9 connector, atop the two USB connectors. This is the port that Linux will recognize as "eth0" when booted.
- Attach the power cable to the Mustang board.
Install the "minicom" package onto your Linux system:
$ sudo yum install minicom
Run the "minicom" command:
$ minicom -D /dev/ttyUSB0
Replace "/dev/ttyUSB0" with the name of the serial interface, which in the case of a single serial port is "ttyUSB0" or "ttyS0".
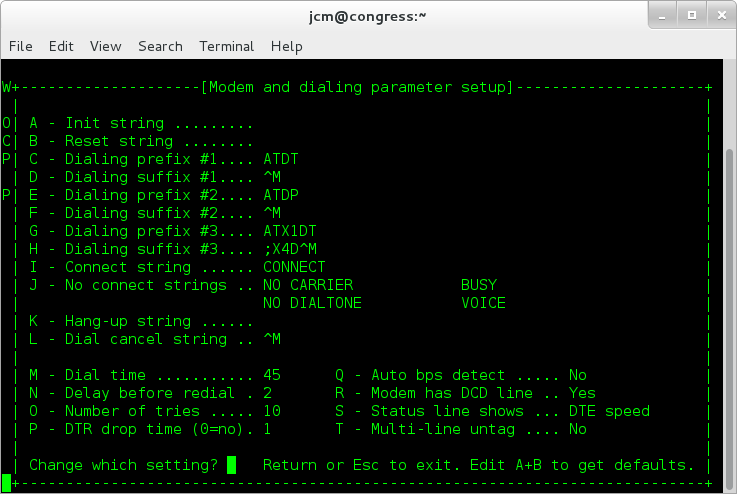
Configure minicom using the "Ctrl-A-O" key sequence. Then select "Modem and dialing". Select "A" and remove the "Init string". Do the same for the "Reset string". The result should look similar to the image below:
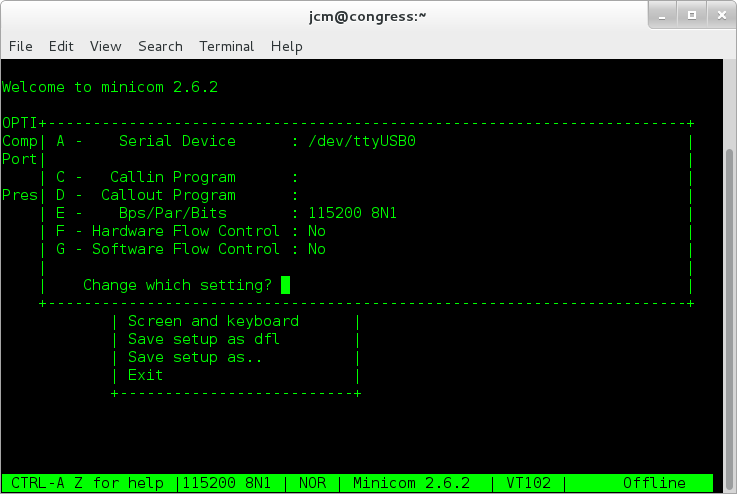
Press escape to return to the previous menu. Next, select "Serial port setup" and ensure that option "E" (Bps/Par/Bits) is set to "115200 8N1", option "F" (Hardware Flow Control) is set to "No", and option "G" (Software Flow Control) is set to "No". The result should look similar to the image below:
Press escape to return to the previous menu, then select "Save setup as dfl" to make the configuration changes to minicom persistent. Press escape again to exit from the configuration menus.
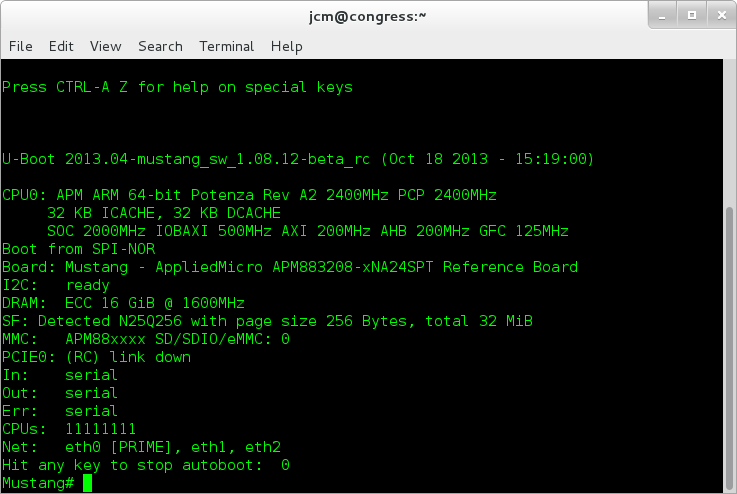
Power on the Mustang board and watch for output from the serial interface. The output should look similar to the image below:
Once you have confirmed that the Mustang board is hooked up correctly, power it off and continue with the following steps.
Upgrade to UEFI
For Mustang systems that are shipped with u-boot, Red Hat is providing a UEFI image and tools to upgrade the firmware to UEFI.
- Host Linux system with the ability to write to an SDCard
- SDCard with a size between 1GB and 8 GB.
Preparation
You will need an SDCard with the fat16 filesystem and the contents of the mustang/ and uefi/ directories on it. Follow these steps.
Insert the SDCard in the host computer
Use gparted (sudo if necessary)
- Select /dev/mmcblock0
- Create a new MSDOS partition table
- Format a new partition as fat16, taking up 2048 MB
- Commit the changes.
Mount /dev/mmcblock0
Copy the mustang/ and uefi/ directories from this package onto /dev/mmcblock0p1
Unmount /dev/mmcblock0 and remove the SDCard from the host computer.
Chain Loading UEFI from U-boot
The u-boot firmware provided by APM cannot update itself, but the UEFI firmware provided by Red Hat can update firmware. The first step to permanently replacing u-boot with UEFI is to convince u-boot to chain load the UEFI firmware.
Reboot the X-C1 server.
While u-boot is booting, it will print the message "Hit any key to stop autoboot". Hit any key within 5 seconds. You should see a prompt.
Put the SDCard in the X-C1 server.
Type the following command
Mustang# printenv
and record the system's MAC address. You will need to program it into UEFI later.
Type the following series of commands:
 Mustang# setenv rh_sd_tiano_sec_ubt fatload mmc 0:1 0x1d000000 /mustang/mustang_tianocore_sec_ubt.fd
 Mustang# setenv rh_sd_tiano_ubt fatload mmc 0:1 0x4002000000 /mustang/mustang_tianocore_ubt.fd
 Mustang# setenv rh_run_tiano_ubt go 0x1d000000
 Mustang# setenv bootcmd run rh_sd_tiano_ubt rh_sd_tiano_sec_ubt rh_run_tiano_ubt
 Mustang# saveenv
This will override the autoboot script to load the UEFI image from the SDCard and chain boot it.
Reboot the X-C1 server.
Mustang# reset
u-boot will start the boot again, and after a few seconds, begin booting UEFI with messages like this:
- 9502720 bytes read in 823 ms (11 MiB/s)
- Starting application at 0x1D000000 ...
- Boot firmware (version 1.1-rh-0.12 built at 08:20:41 on Jul 23 2014)
- PROGRESS CODE: V3020003 I0
- PROGRESS CODE: V3020002 I0
- PROGRESS CODE: V3020003 I0
- PROGRESS CODE: V3020002 I0
- PROGRESS CODE: V3020003 I0
- PROGRESS CODE: V3020002 I0
- PROGRESS CODE: V3020003 I0
- PROGRESS CODE: V3021001 I0
Eventually, the messages like this will be printed:
- TianoCore 1.1-rh-0.12-beta2 UEFI 2.4.0 Jul 23 2014 08:20:16
- CPU: APM ARM 64-bit Potenza 1600MHz PCP 1600MHz
- 32 KB ICACHE, 32 KB DCACHE
- SOC 2000MHz IOBAXI 400MHz AXI 250MHz AHB 200MHz GFC 125MHz
- Board: X-Gene Mustang Board
- The default boot selection will start in 5 seconds
Hit any key to break into the UEFI boot sequence. A menu will be printed, and select "b" for the UEFI command shell.
Type fs1: and hit return to switch to the SDCard.
Type 'cd uefi' to enter the uefi folder.
Run the upgrade tool with UpgradeFirmware.efi upgrade.cmd. It will take a few minutes for the upgrade to complete. If you power off your machine at this point, you're intensely screwed, so don't do that.
At this point, the X-C1 will boot directly into UEFI in the future.
Reboot the machine with reset. You should remove the SDCard.
You will not see the u-boot messages, but instead the UEFI messages.
When this message appears,
- The default boot selection will start in 5 seconds
hit a key to break into the boot sequence and again select option b to get the shell.
Set the MAC address by typing 'set MAC0 aa:bb:cc:dd:ee:ff', replacing aa:bb:cc:dd:ee:ff with the MAC address you wrote down earlier.
Type reset to reboot the machine again.
The X-C1 will reboot. Without any defined boot options, it will attempt to PXE install. You will need a PXE server as described in the Fedora Installation Guide
Netbooting tips
The following tips may be helpful for doing a Netinstall of Fedora on the Mustang. These instructions were tested with F24 and assume UEFI based firmware.
The boot menu gives some options:
[1] APM Linux from SATA
[2] APM Linux by TFTP (eth0)
[3] Shell
[4] Boot Manager
[5] Reboot
[6] Shutdown
Ignore any existing TFTP options. Select '4' for Boot Manager
[1] Add Boot Device Entry
[2] Update Boot Device Entry
[3] Remove Boot Device Entry
[4] Set Boot Timeout
[5] Return to main menu
and select '1' for Add Boot Device Entry
[1]  (952 MB)
[2] VenHw(6C9CEEF0-A406-11E3-A5E2-0800200C9A66)
[3] VenHw(02118005-9DA7-443A-92D5-781F022AEDBB)
[4] VenHw(F40A3869-92C4-4275-8501-4491A1A20C19)
[5] VenHw(B225ED30-6DFD-43A9-BF6B-5753358F2F70)
[6] PXE on MAC Address: 00:01:73:02:3B:9C
[7] PXE on MAC Address: 00:01:73:02:3B:9D
[8] PXE on MAC Address: 00:01:73:02:3B:9E
[9] PXE on MAC Address: 00:01:73:02:3B:9F
[10] TFTP on MAC Address: 00:01:73:02:3B:9C
[11] TFTP on MAC Address: 00:01:73:02:3B:9D
[12] TFTP on MAC Address: 00:01:73:02:3B:9E
[13] TFTP on MAC Address: 00:01:73:02:3B:9F
[14] Return to Main Menu
These are the boot device options available. The addresses may be different. You want to select the PXE option for eth0, typically marked on the device or the lowest MAC address. Enter no arguments for the EFI application and give it an appropriate name. You can now return to the Main Menu and select your option for booting.


