From Fedora Project Wiki
Description
This test case tests whether old projects cloned with Fedora Packager for Eclipse 0.1.12 and below can be properly upgraded to Fedora Packager for Eclipse 0.2 using the conversion tool shipped with 0.2.
Setup
- Boot into the machine/VM you wish to test
- Make sure that file ~/.fedora.cert does not exist. You can move it out of the way via
mv ~/.fedora.cert{,-away} - Create a 0.1.12 Fedora Packager for Eclipse project in order to have something to upgrade. If you have 0.1.12 projects in some existing workspace, you can use these instead.
- Download Eclipse Indigo classic
- Extract the tarball in your home directory and run it: e.g.
mkdir -p ~/test_day_efp/eclipse-indigo-upgrade-test && cd ~/test_day_efp/eclipse-indigo-upgrade-test && tar -xzvf <ECLIPSE_3.7_TARBALL> && ./eclipse/eclipse -data ~/workspace_fpe_upgrade - Install Fedora Packager for Eclipse 0.1.12 from our p2 repository:
- Go to "Help" => "Install New Software..."
- Click on "Add.."
- Enter a "Name" for the repository, for example "Fedora Packager for Eclipse"
- In the "Location" field enter: https://fedorahosted.org/released/eclipse-fedorapackager/p2-repo/
- Click "OK" and wait until the list of available software comes up.
- Below the list of available software, uncheck "Group items by category" and "Show only latest versions of software".
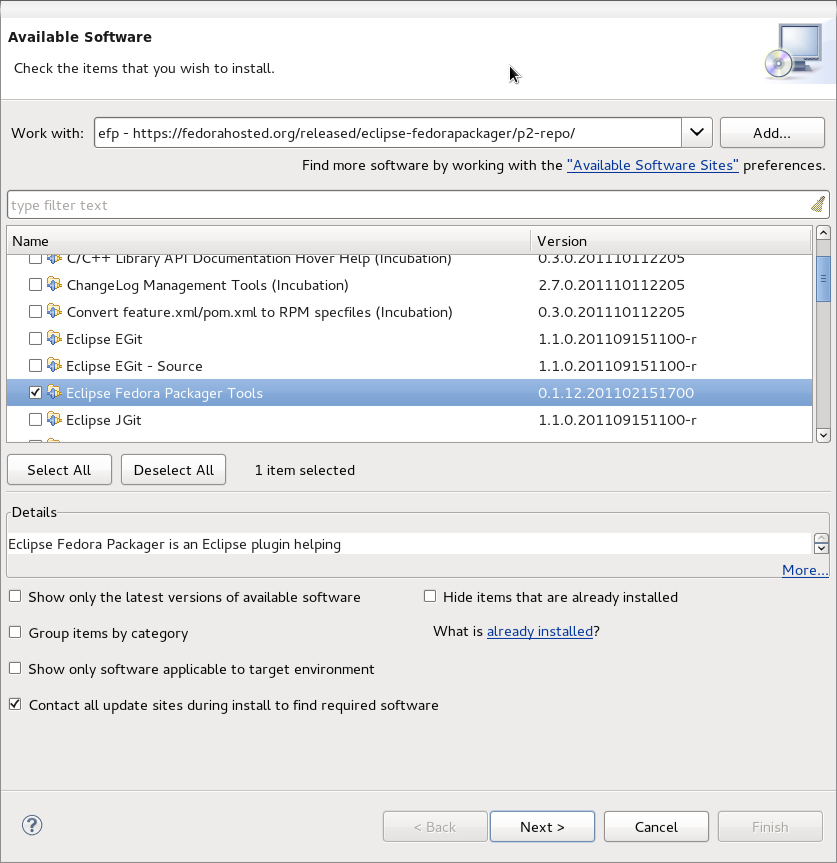
- Then, select "Eclipse Fedora Packager Tools" from the list of available packages. Make sure to install version 0.1.12.X
- The installation dialog should now look similar to this:

- Click "Next >", accept the license and click "Ok" if warnings are presented with respect to unsigned software being installed.
- When Eclipse asks if it should restart, select "Restart now".
- Now you should have Fedora Packager for Eclipse 0.1.12 installed.
- Import packages from Fedora Git via "File" => "Import" => "Git" => "Projects from Fedora Git". Enter
 eclipse-fedorapackager
 - Repeat step 12 but use package name
 ed
ed - You should now see two 0.1.12 projects, namely "eclipse-fedorapackager" and "ed, in your workspace.
- If you right-click on either project, you should see a context menu item called "Fedora Packager"
How to test
- Open Eclipse as provided with Fedora. Don't use Eclipse which you have downloaded in the "Setup" section.
$ cd ~ && eclipse -data ~/workspace_fpe_upgrade - Open the "Import from Fedora Git" wizard. Press CTRL+3 and start typing "Projects from Fedora" and hit return once it's the only option shown. Alternatively, use File => Import => Git => Projects from Fedora Git
- You should now see the "eclipse-fedorapackager" and "ed" projects in your Eclipse workspace again.
- We now install Fedora Packager for Eclipse 0.2.
yum install eclipse-fedorapackager-0.2.1-1.fc16 - Restart Eclipse. File => Restart.
- Once Eclipse has been restarted, try right-clicking on project "eclipse-fedorapackager". The "Fedora Packager" context menu item should be gone. Now we need to upgrade this project in order for the context menu to show up again.
- Open the "Fedora Packaging" perspective. Go to "Window" => "Open Perspective" => "Other..." and select "Fedora Packaging"
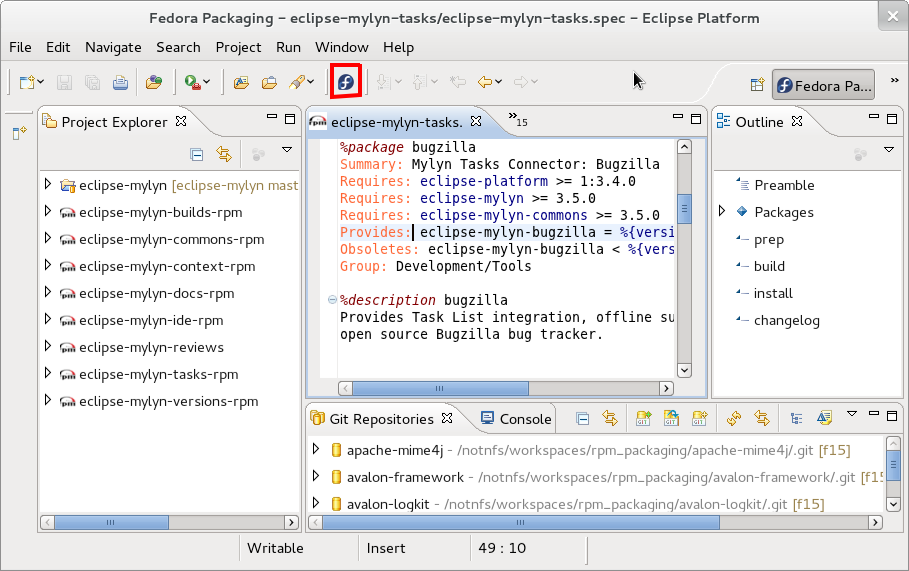
- Click the Fedora icon as shown in this image:

- Select project
eclipse-fedorapackagerfrom the list and click OK. - You should get expected results as noted below. Don't forget to reinstate your Fedora certificates:
mv ~/.fedora.cert{-away,}
Expected Results
- A message dialog should show up indicating that project
eclipse-fedorapackagergot converted. - If you right-click on project "eclipse-fedorapackager" you should see the "Fedora Packager" context menu item again.
- If you double-click on the file
eclipse-fedorapackager.specthe contents of the .spec file should show and right-clicking in that .spec file should show the "Fedora Packager" context menu item as well.

